| View previous topic :: View next topic |
| Author |
Message |
Baxsie
Joined: 12 Apr 2012
Posts: 253
|
 Posted: Wed Mar 11, 2015 7:48 pm Post subject: Keeping the stereo from rebooting or resetting when starting Posted: Wed Mar 11, 2015 7:48 pm Post subject: Keeping the stereo from rebooting or resetting when starting |
 |
|
As we finished up the wiring, I was dismayed to find out that the stereo reset when we cranked the starter, even though it was connected to "continuous battery" power.
I cannot stand for that ! Here is the solution we came up with:
http://www.thesamba.com/vw/forum/viewtopic.php?p=7589991#7589991 |
|
| Back to top |
|
 |
Bad Bug Two

Joined: 23 Feb 2007
Posts: 94
Location: Spokane, WA
|
 Posted: Wed Mar 18, 2015 3:59 am Post subject: Re: Keeping the stereo from rebooting or resetting when star Posted: Wed Mar 18, 2015 3:59 am Post subject: Re: Keeping the stereo from rebooting or resetting when star |
 |
|
Looks good. There is more than one way to skin a cat, but this should get it done nicely.
Looking at the diagram you wrote out for it, I assume that you have insured that all relays on the bug have either clamping diodes or bleed resistors?
Looking forward to getting that thing on the dyno! 
_________________
Jeff Rogers
www.badbugracing.com
9.35 @ 145 |
|
| Back to top |
|
 |
Baxsie
Joined: 12 Apr 2012
Posts: 253
|
 Posted: Mon Mar 23, 2015 5:41 pm Post subject: Dynapad Sound Dampener Under Seats Posted: Mon Mar 23, 2015 5:41 pm Post subject: Dynapad Sound Dampener Under Seats |
 |
|
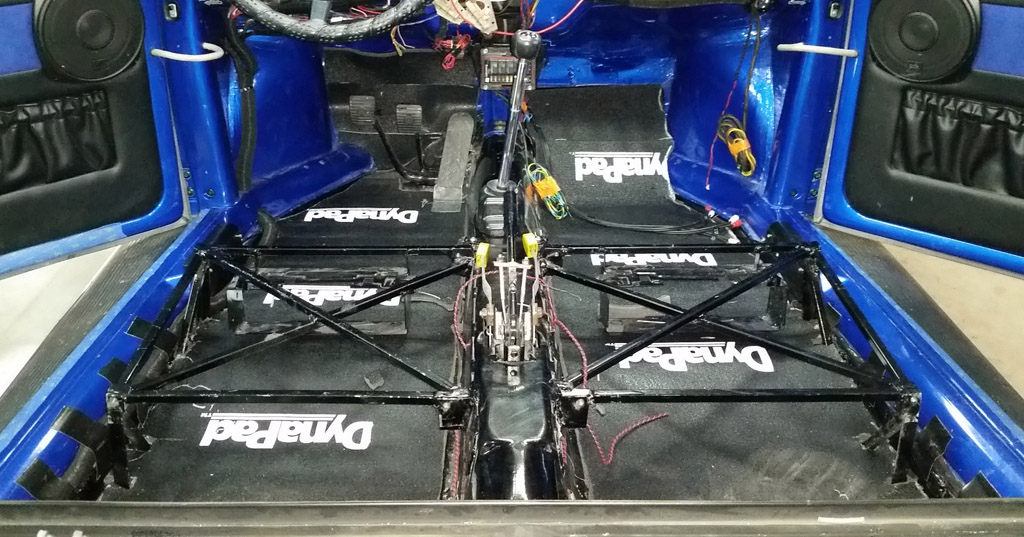
Here is the Dynapad under the front seats:
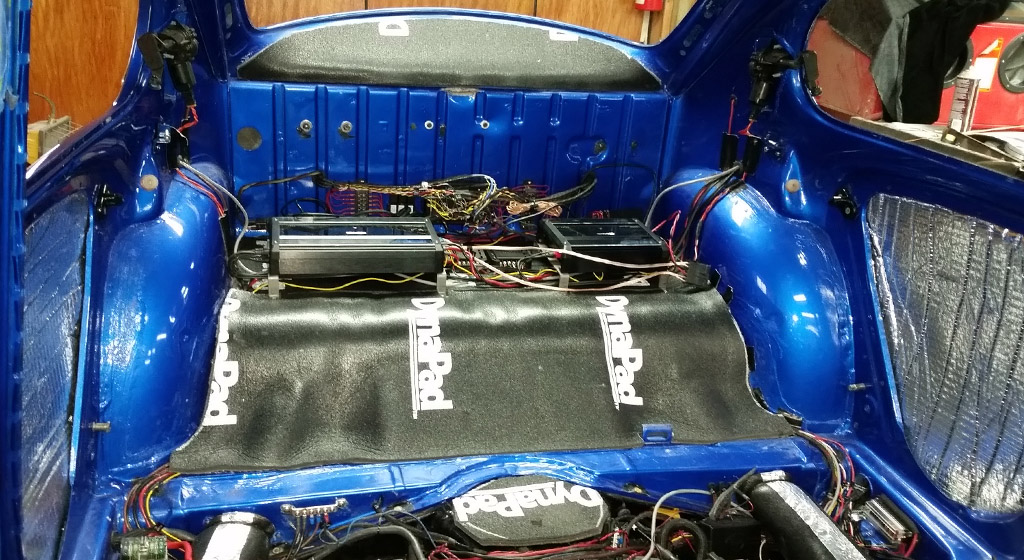
And Under the rear seats:
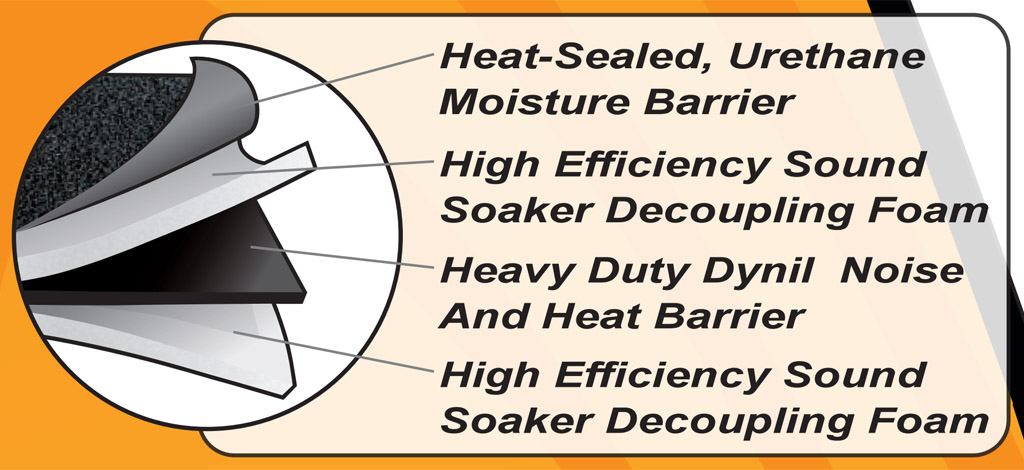
This is NOT DynaMat: | Quote: | | DynaPad is a 3/8", four-layer composite barrier material utilizing a 1 pound per square foot vinyl barrier that is sandwiched between two layers of acoustic foam with a urethane top layer. DynaPad is designed to provide an under carpet sound barrier in automotive interiors, residential and commercial dwellings. The material can withstand temperature ranges between -40°F and +225°F (-40°C to +107°C) |
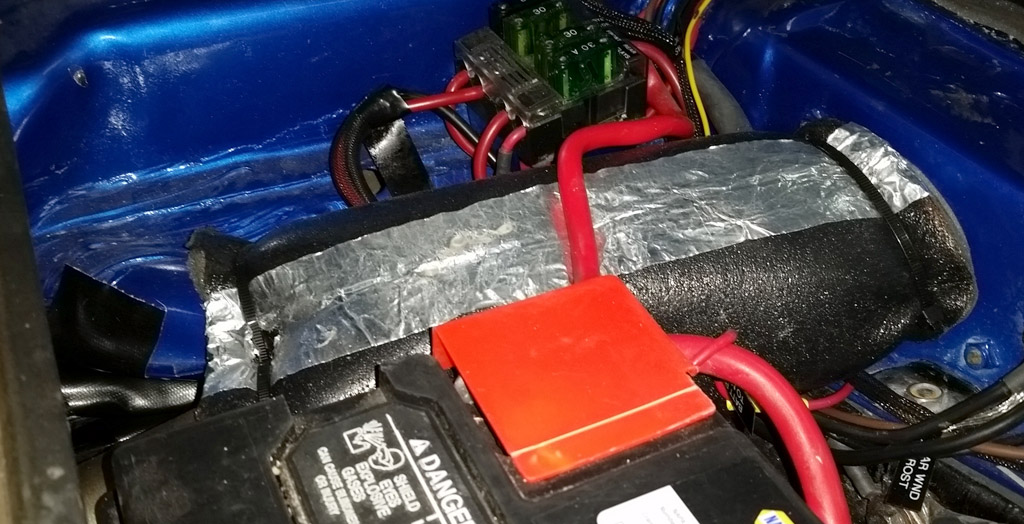
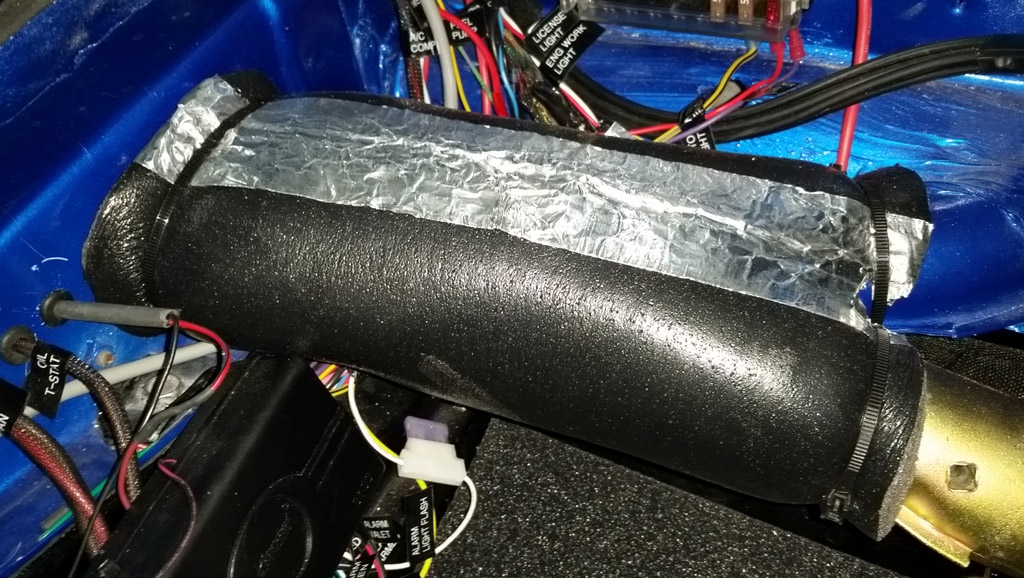
I also used it to wrap around the heater connections, with aluminum tape and zip ties for sealing. Hopefully it will be able to withstand the temperatures:
 |
|
| Back to top |
|
 |
Baxsie
Joined: 12 Apr 2012
Posts: 253
|
 Posted: Mon Mar 30, 2015 7:01 pm Post subject: Adding Tach and AFR gauges to Super Beetle 1303 Dash Posted: Mon Mar 30, 2015 7:01 pm Post subject: Adding Tach and AFR gauges to Super Beetle 1303 Dash |
 |
|
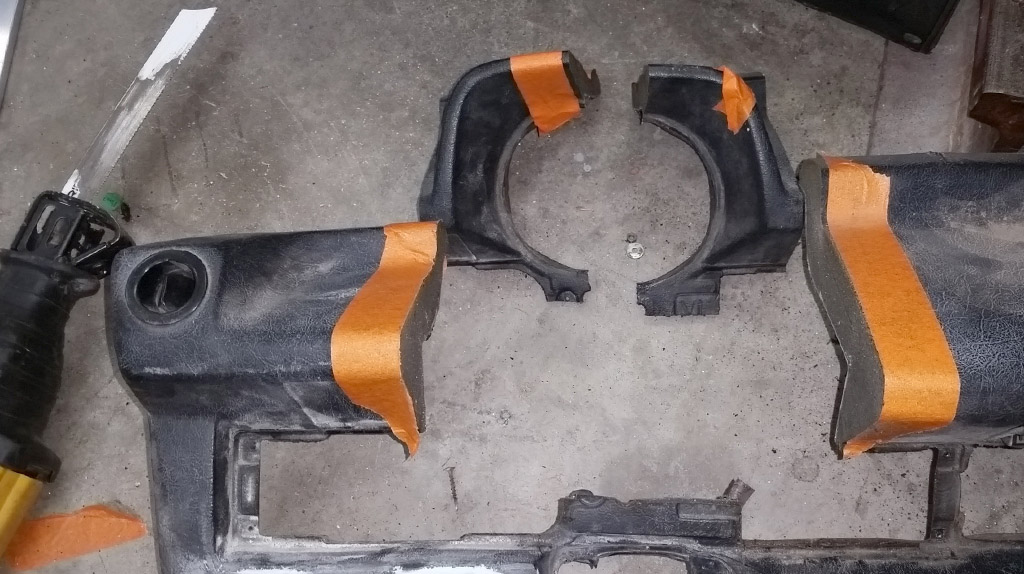
We wanted to add a ttach and AFR gauge up by the speedo, so we did not have to look way down to see things. To do that we aimed at making the pod on the 1303 super beetle dash wider.
Cutting the sides of the pod from the donor dash:
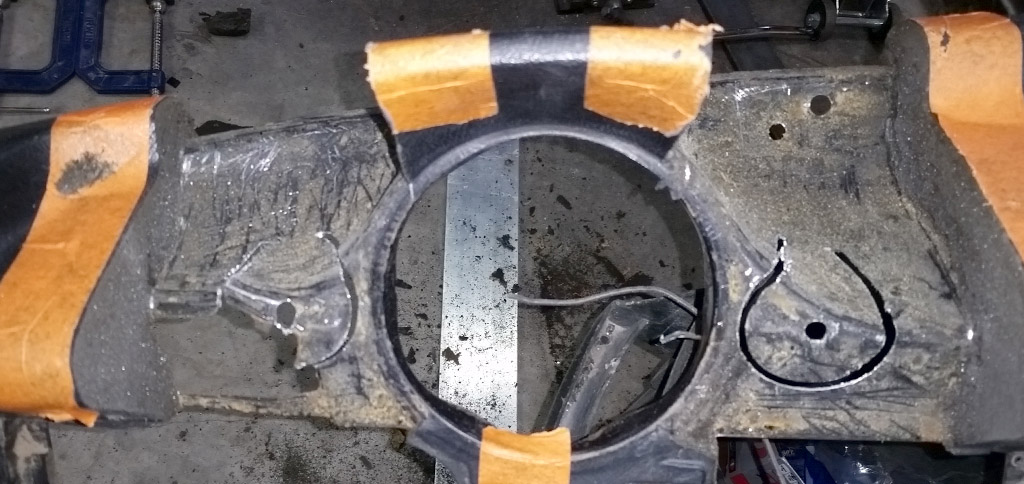
We then cut slices out of the keeper dash, spread enough to accommodate the new gauges:
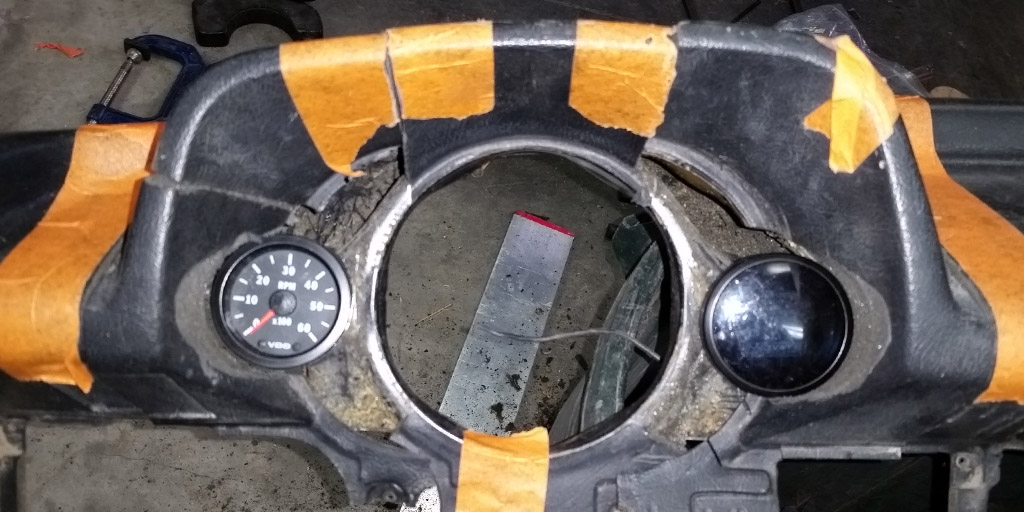
This is the first mock-up to see if it is even going to be close:
We then glued the slices into place. The one on the right (towards the center) went in without much trouble, the curves are a lot slighter there. On the left (towards the outside) things had to be chopped more to get all the curves to work out:
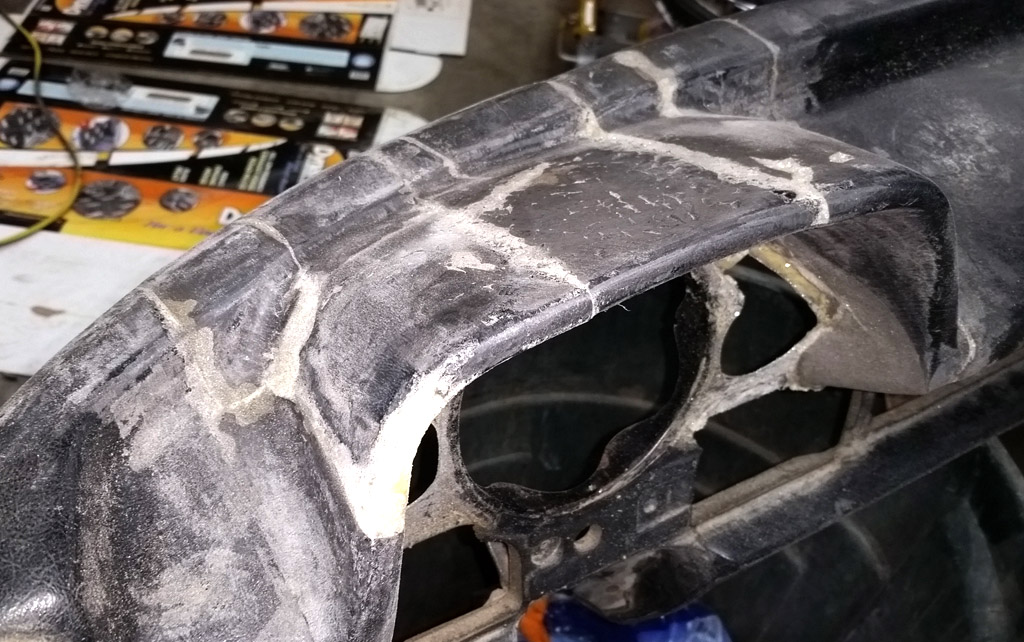
While gluing the major surgery areas, we also cleaned out and filled the cracks:
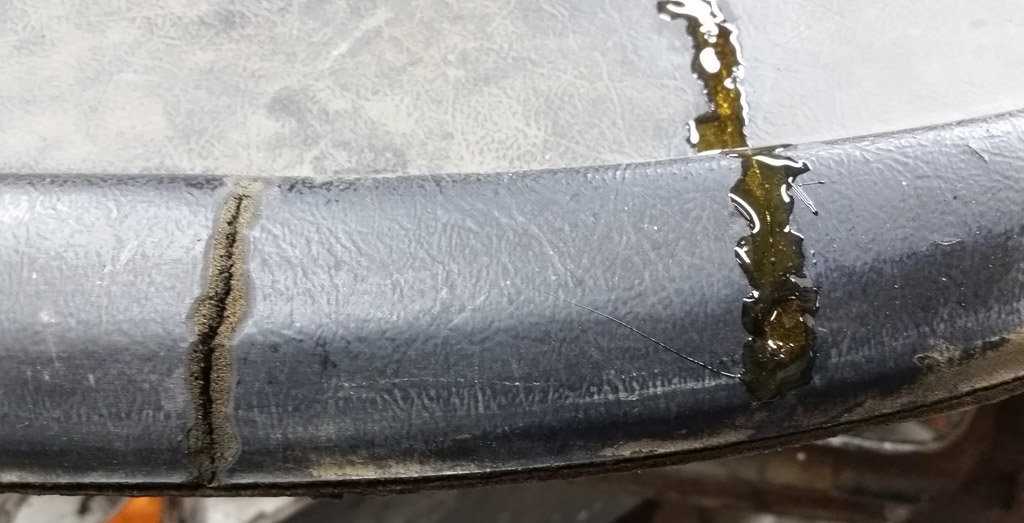
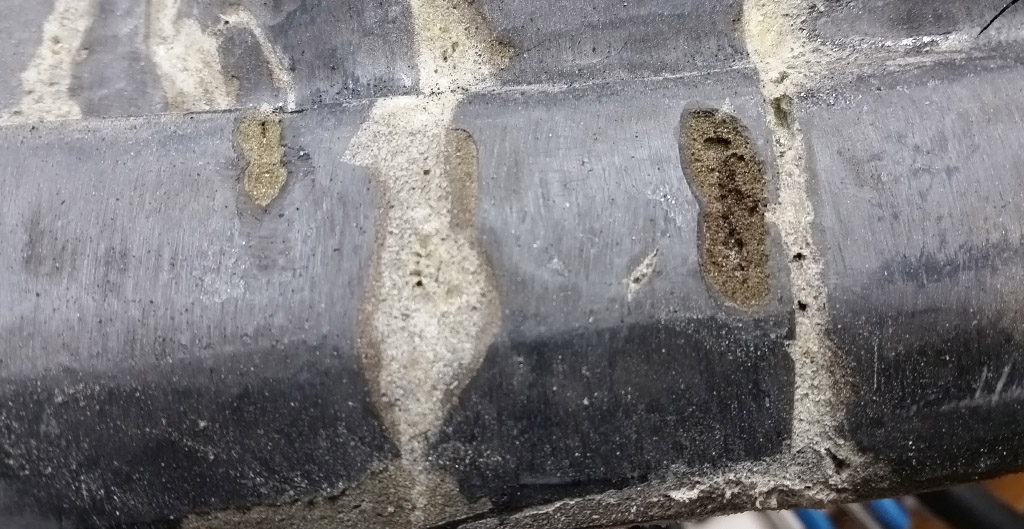
After sanding the glue (just dumb old Gorilla Glue) we then sanded the vinyl thin at the edge of the crack to avoid it popping up:
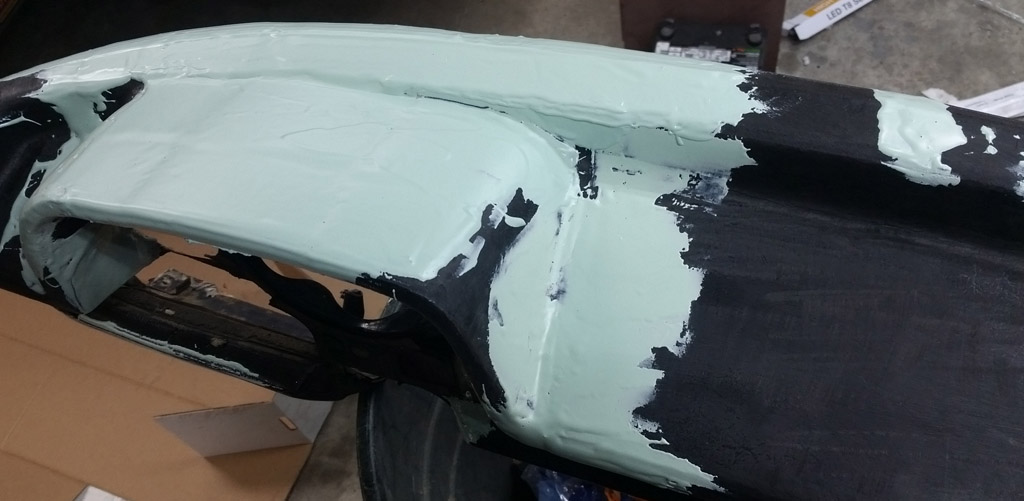
Then it was time to smooth things out with some body filler:
Once the shape was settled down a bit, we made a cardboard template:
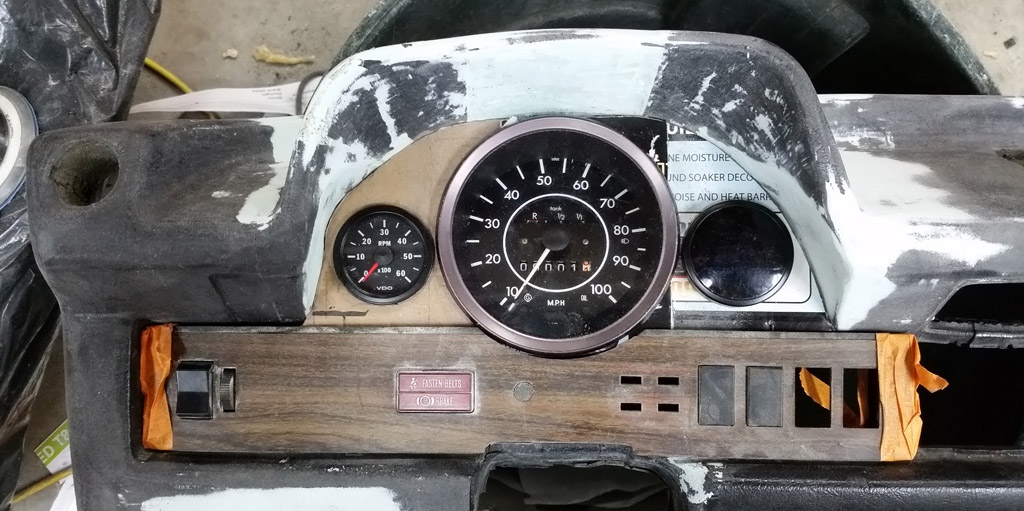
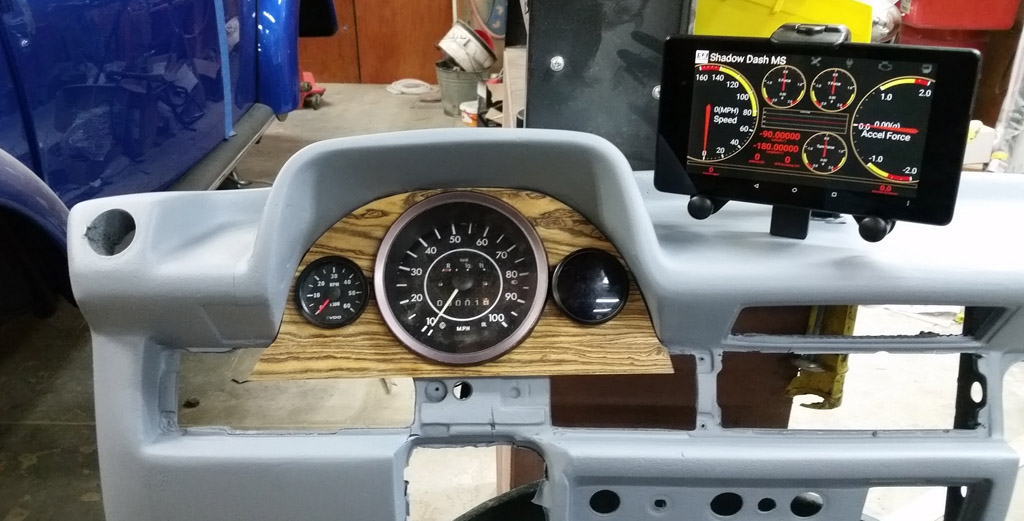
We then made the old school instrument panel with Bocote wood. This is just sanded, I think it is going to be georgeous when it is varnished:
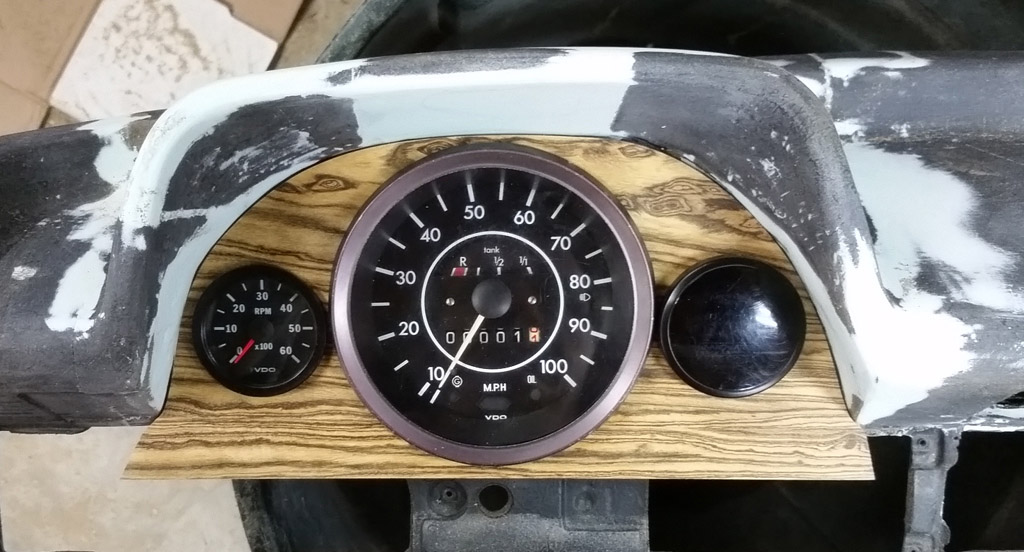
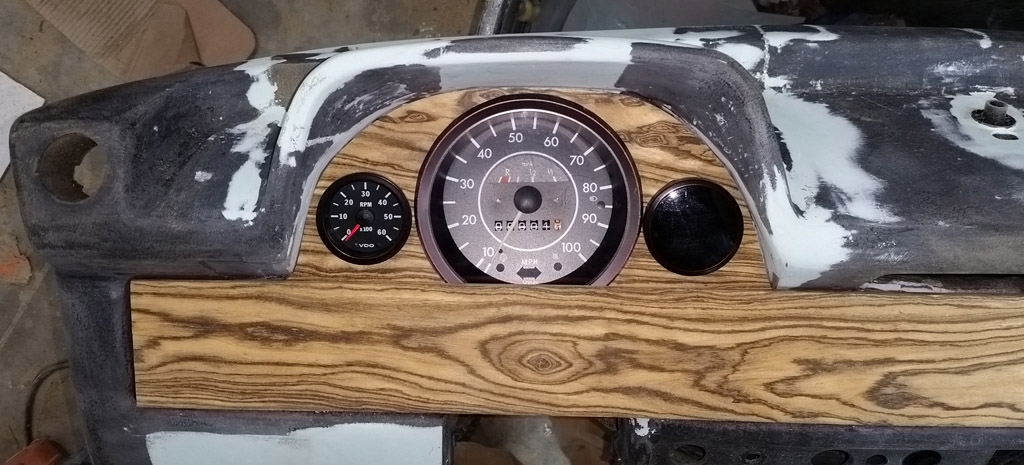
Next up will be making the switch panel, out of the same wood. We put a plank here to get an idea:
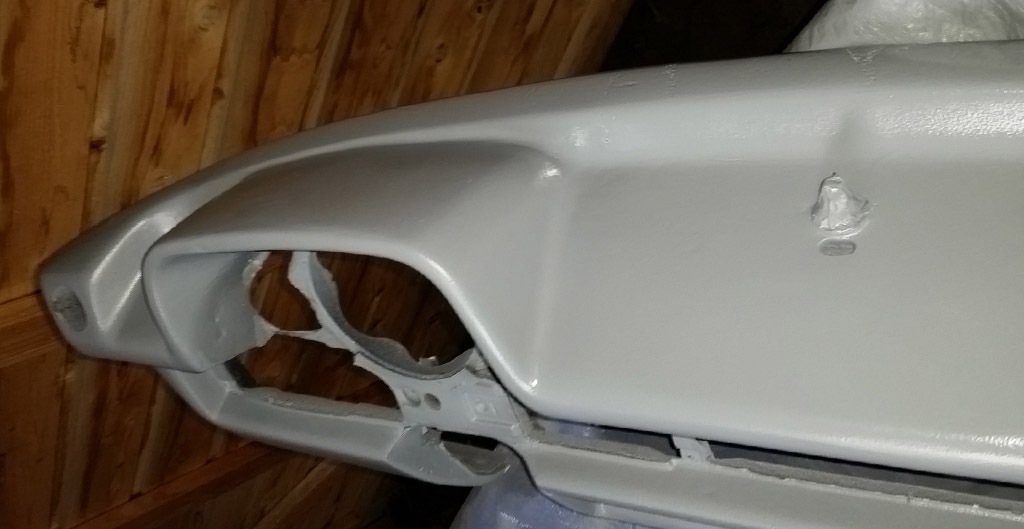
In order to give the upholstery folks some kind of a good surface to glue to, we shot the dash with a coat of 2K epoxy sealer:
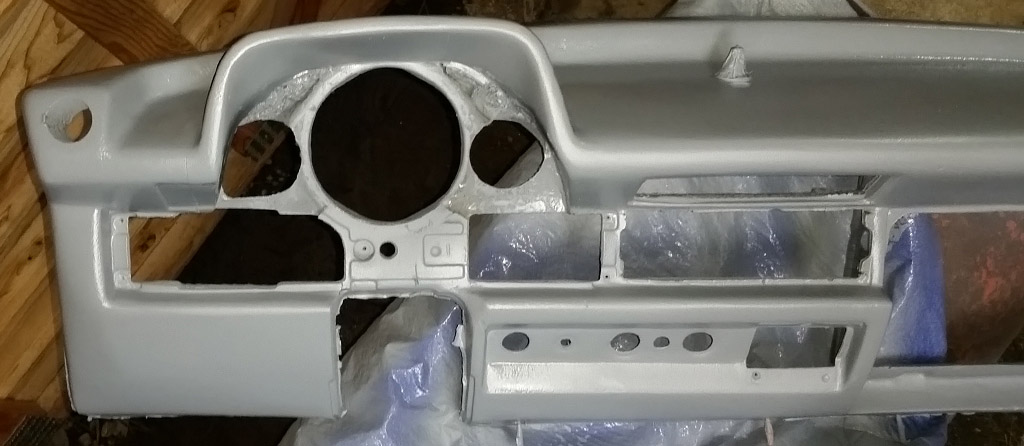
The peg and hole towards the center will mount a Nexus 7 running Sygic GPS (Sygic stores maps to your device, and so will work with no data connection) and Shadow Dash MS:
 |
|
| Back to top |
|
 |
Baxsie
Joined: 12 Apr 2012
Posts: 253
|
 Posted: Sun Apr 05, 2015 12:15 pm Post subject: Bocote Hardwood switch panel for Super Beetle 1303 Dash Posted: Sun Apr 05, 2015 12:15 pm Post subject: Bocote Hardwood switch panel for Super Beetle 1303 Dash |
 |
|
More work on the dash. After much fussing with the CAD and CAM for the CNC router, we finally got it to cut out a part. We used some cheap paneling to get things sorted--it took 6 revisions:
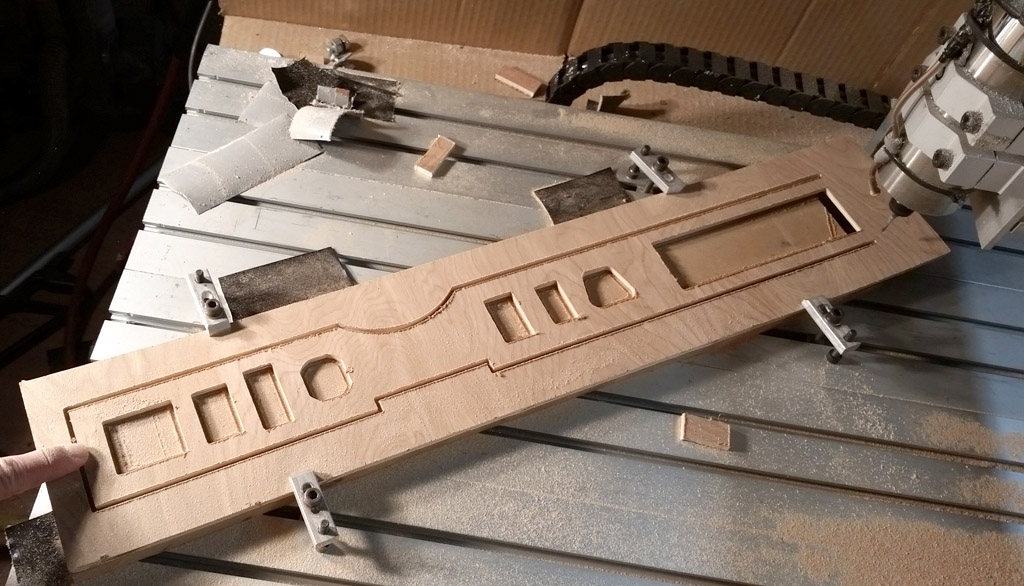
Here is the initial switch positions we had planned on:
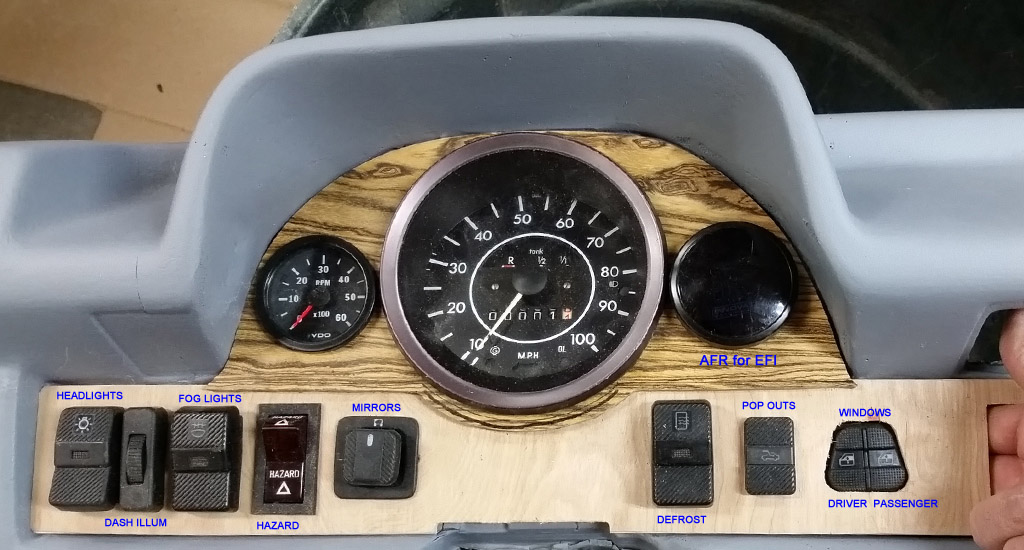
After looking at it a bit, we decided to swap the defrost and hazard flasher. That puts all the taller Passat style switch lined up nicely on the left, and the flatter switches on the right. Even though it is going to take some effort, we decided to bag the triangle window switch that came with the window kit, opting back to the Passat window switch. To use the Passat window switch, I'll have to make an adapter to convert the switch signals to what the motors need. In the Passat, there is a window control module that does this and a bunch of other stuff. On the up side, I could make it "auto" and have an input from the alarm to auto close the windows when the alarm is armed.
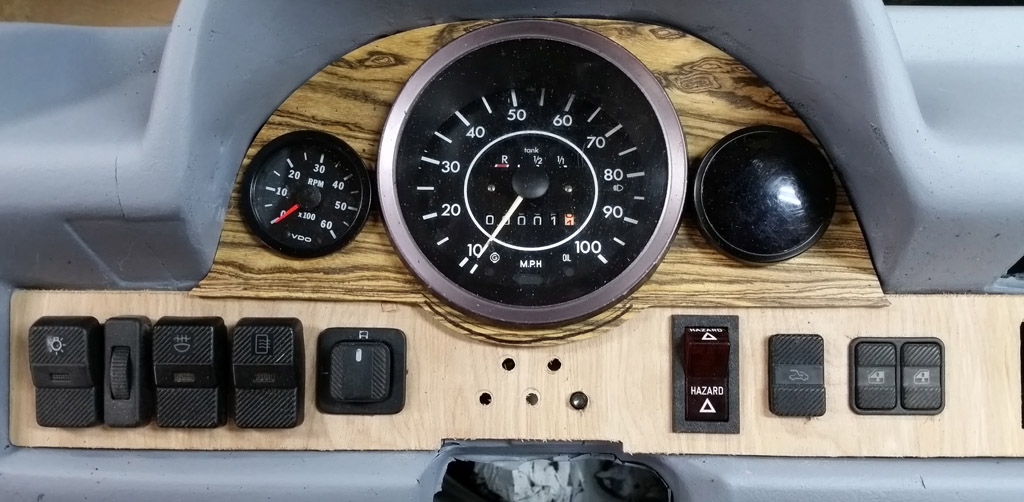
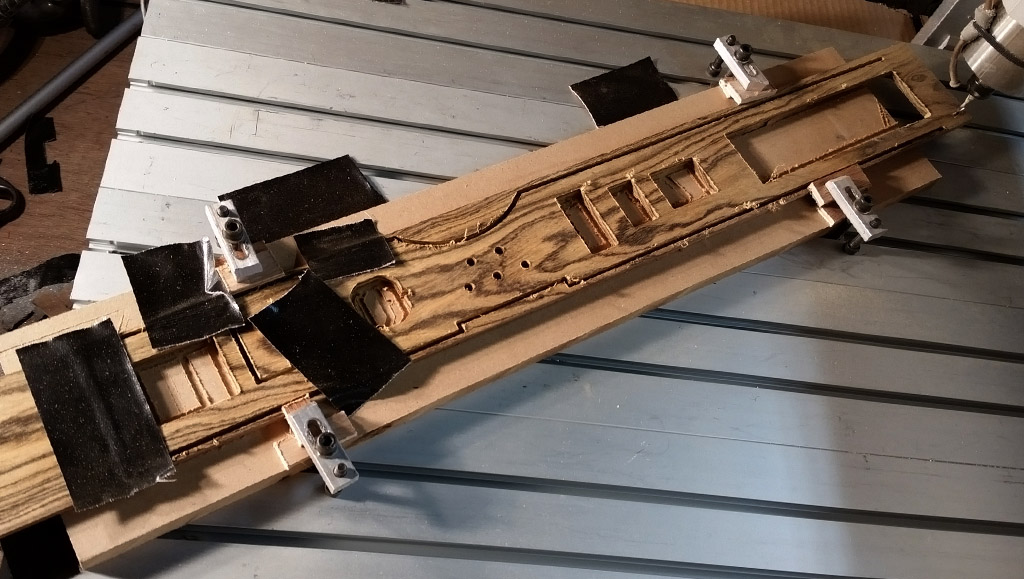
Once that was settled, we were confident enough to put the hardwood into the mill and cut it out:
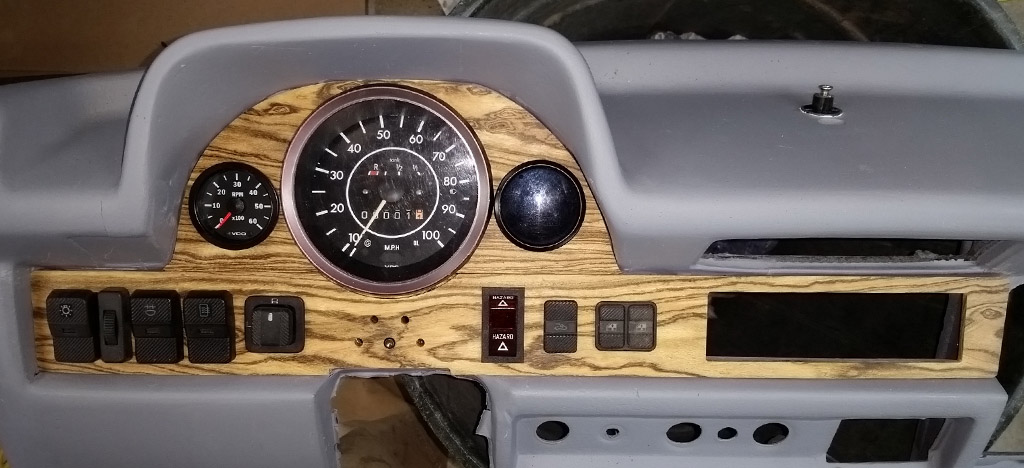
We then hand trimmed the bottom of the gauge panel to mate with the switch panel, and put it together to see how it will fit. Under the speedometer we put the five LED indicator lights:Cruise engaged (green)
Alarm armed (blue)
From brake circuit warning (red)
Park brake on (amber)
Back brake circuit warning (red) We used trick black metal LED indicators from Alpinetech. There is one installed center bottom under the speedo:
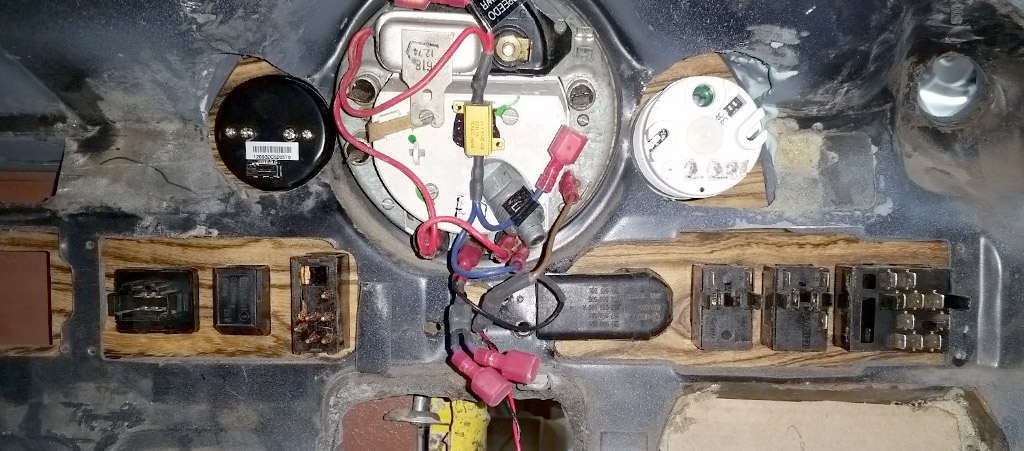
A check of the switch clearance behind the dash. About the only tricky thing is that the mirror switch needs to come out before the panel can be removed:
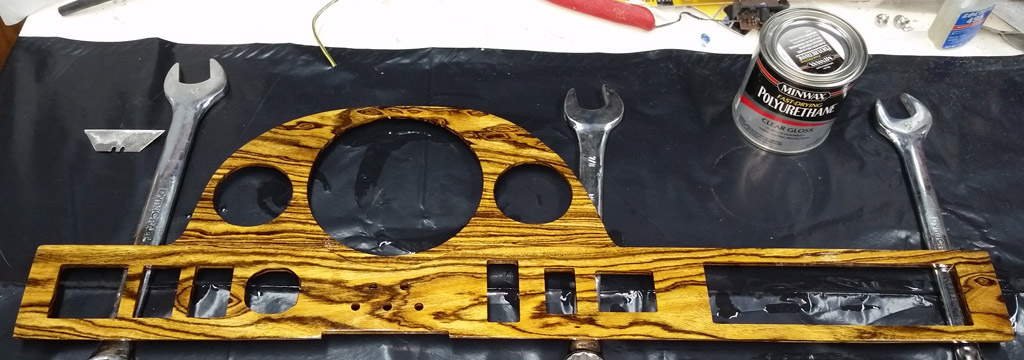
We decided to glue the top and bottom pieces together. Originally we thought that one might lap over the other, but they end up being edge-on. By gluing it will avoid any misalignment. Here it is with the first coat of polyurethane varnish on it:
 |
|
| Back to top |
|
 |
Baxsie
Joined: 12 Apr 2012
Posts: 253
|
 Posted: Sat May 02, 2015 11:41 am Post subject: HumVee / HMMV Seat Belts and Pop Out glass reinstall Posted: Sat May 02, 2015 11:41 am Post subject: HumVee / HMMV Seat Belts and Pop Out glass reinstall |
 |
|
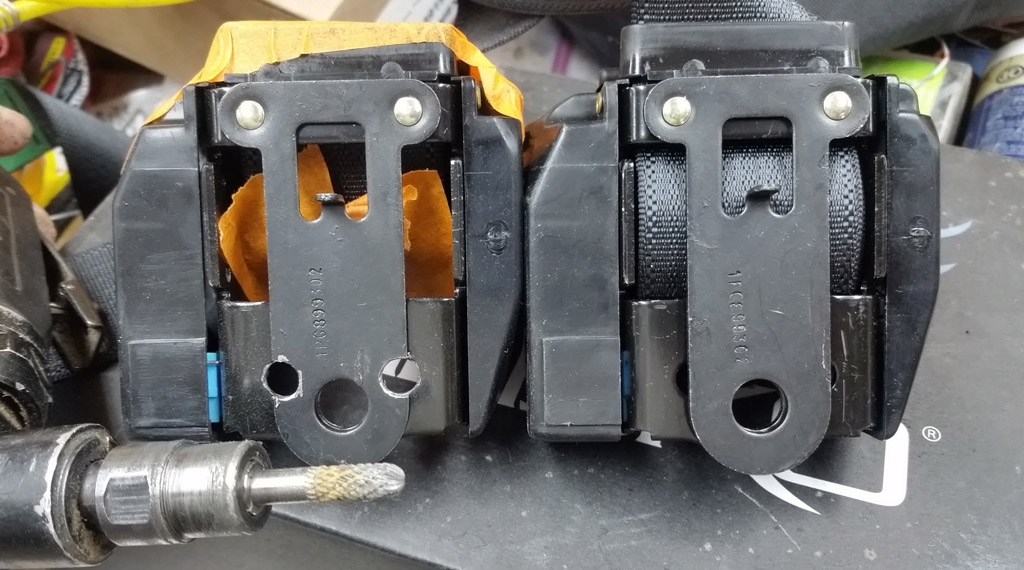
Installing the HumVee / HMMV seat belts from e-bay was cake, as many others have said. About the only fiddly bit was modifying the retractor slightly to fit on the original VW bracket. Once that was complete they bolted right up:
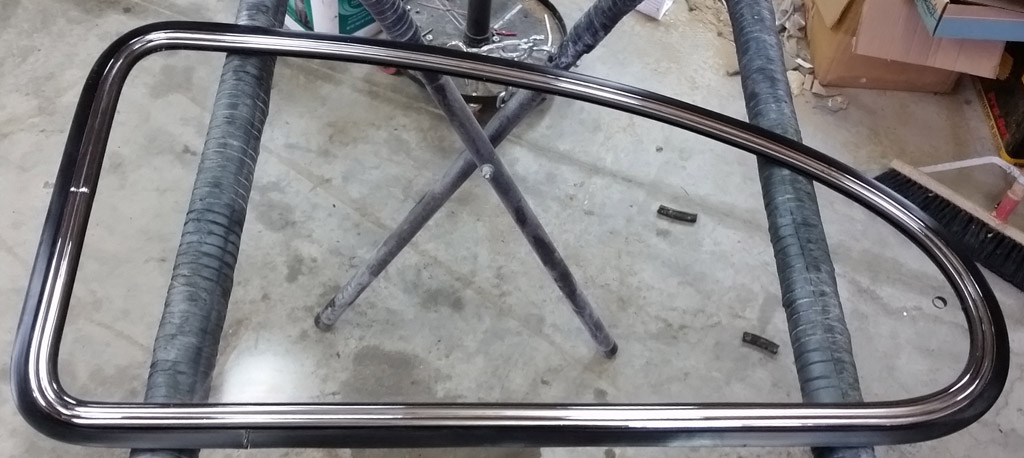
Re-installing the glass in the freshly chromed pop out frames was a complete bear. Lots of foaming hand soap in a utility sprayer helped.
I could not find the "correct" pop-out glass to frame seal (113-133A) when I ordered the rubber. I had a part intended for a bus pop-out by mistake (221845325B) which I like better than the right ones. The bus part has a lip at the top of the U that helps keep it centered during install. Here is that victory moment of finally getting it to come together:
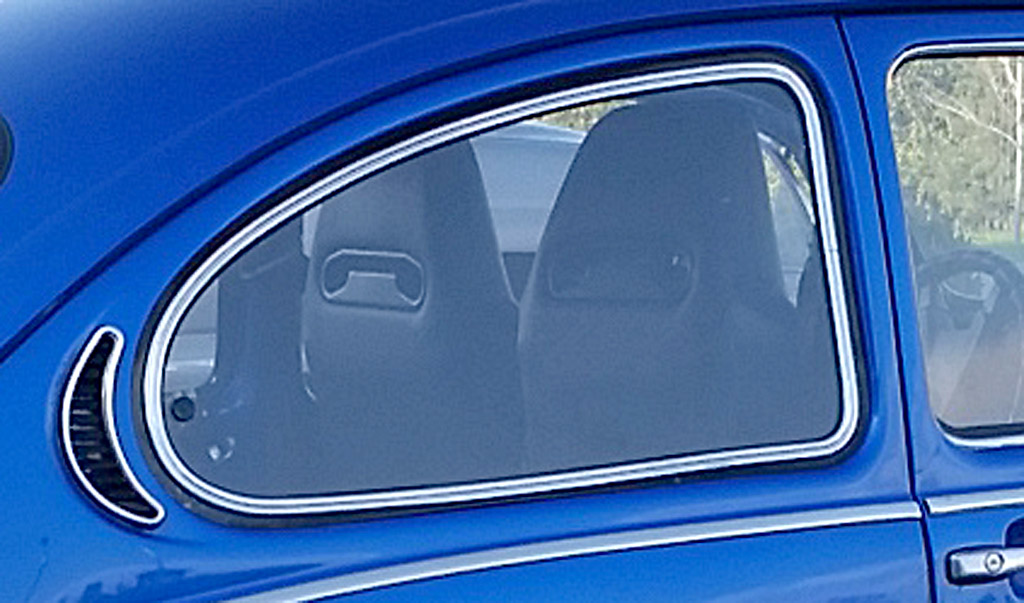
The fresh chrome looks great:
 |
|
| Back to top |
|
 |
Baxsie
Joined: 12 Apr 2012
Posts: 253
|
 Posted: Sat May 02, 2015 12:59 pm Post subject: Sunroof and Sunroof Headliner Install Posted: Sat May 02, 2015 12:59 pm Post subject: Sunroof and Sunroof Headliner Install |
 |
|
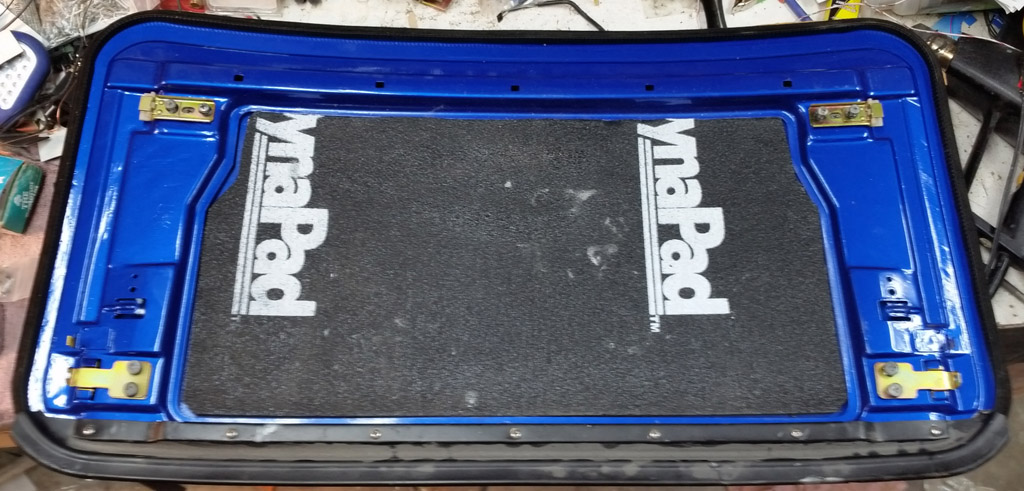
We decided to try the DynaPad sound deadner on the sunroof. We installed it with 3M™ Hi-Strength 90 Adhesive. Hopefully it will hold up under heat.
For the install, we leaned heavily on:
Super Beetle Sunroof Adventure
and:
Volkswagen SUNROOF ProTraining
Be aware that the rabbit manual calls out a metal ramp, the bugs do not have that as a separate part, it is built into the sunroof frame.
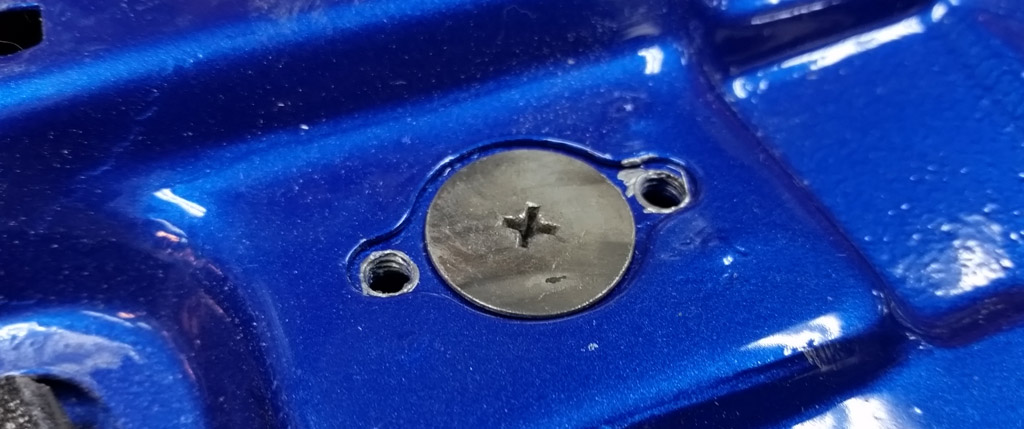
The front height adjustment uses this huge flat head screw to set the height away from the sheet metal:
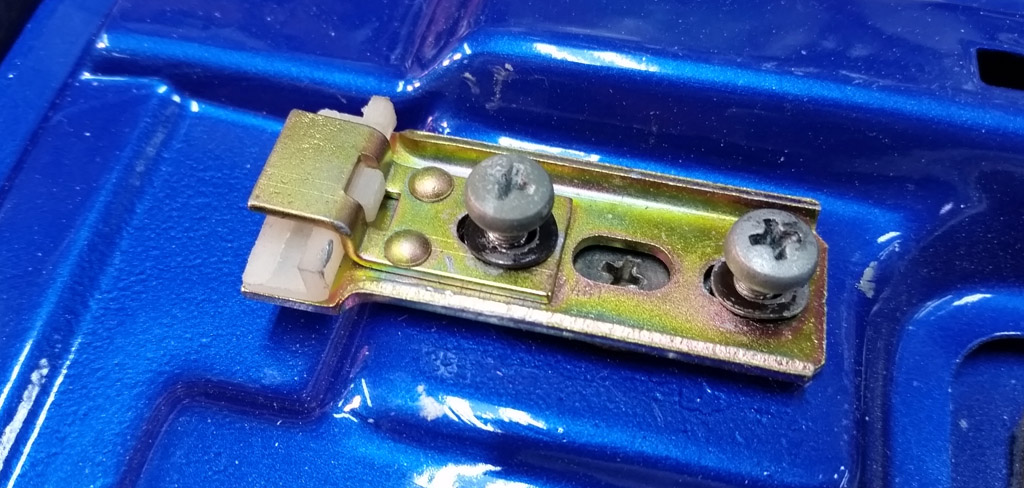
Then the bracket is screwed against the height set by the screw:
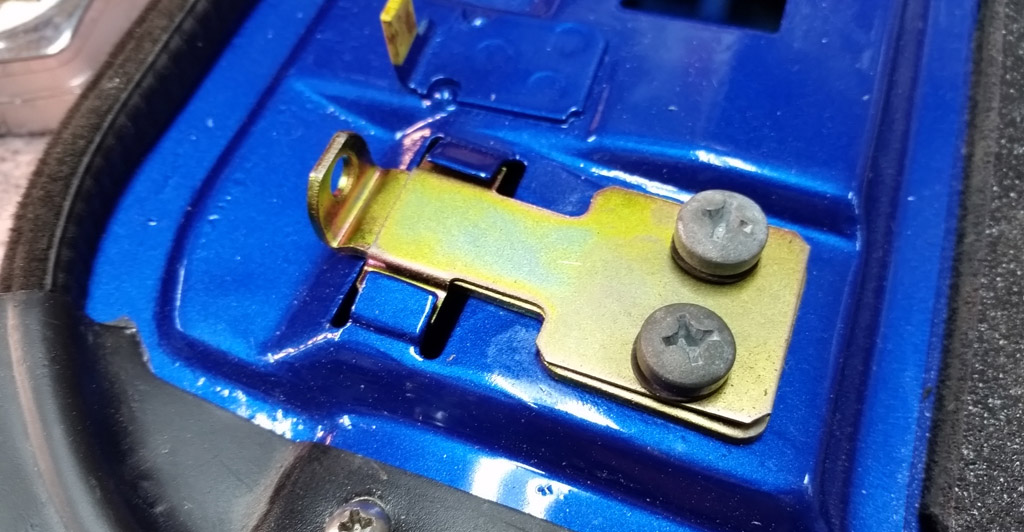
The rear attachment bracket has slots in it, and a thinner steel cover that kinda clips it into place:
There are two mirror-image cables, rach has a little plastic trolley that slides in the track at the rear:
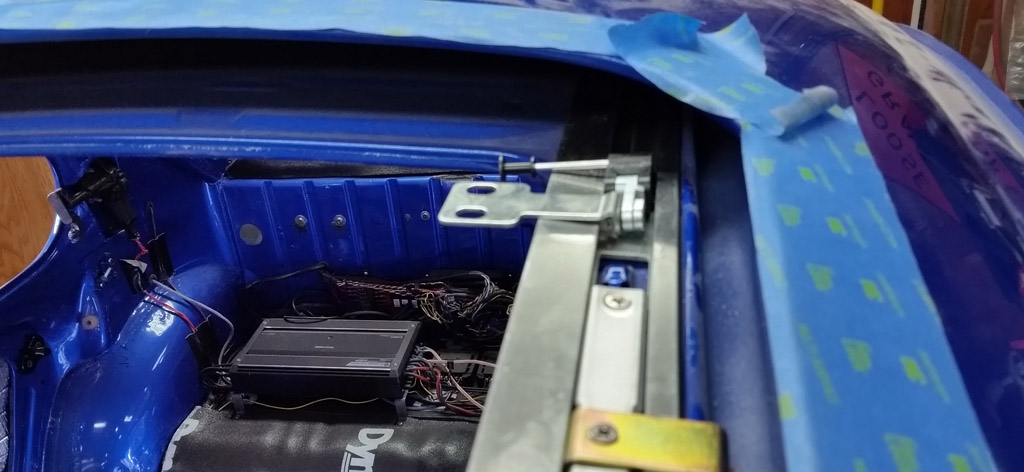
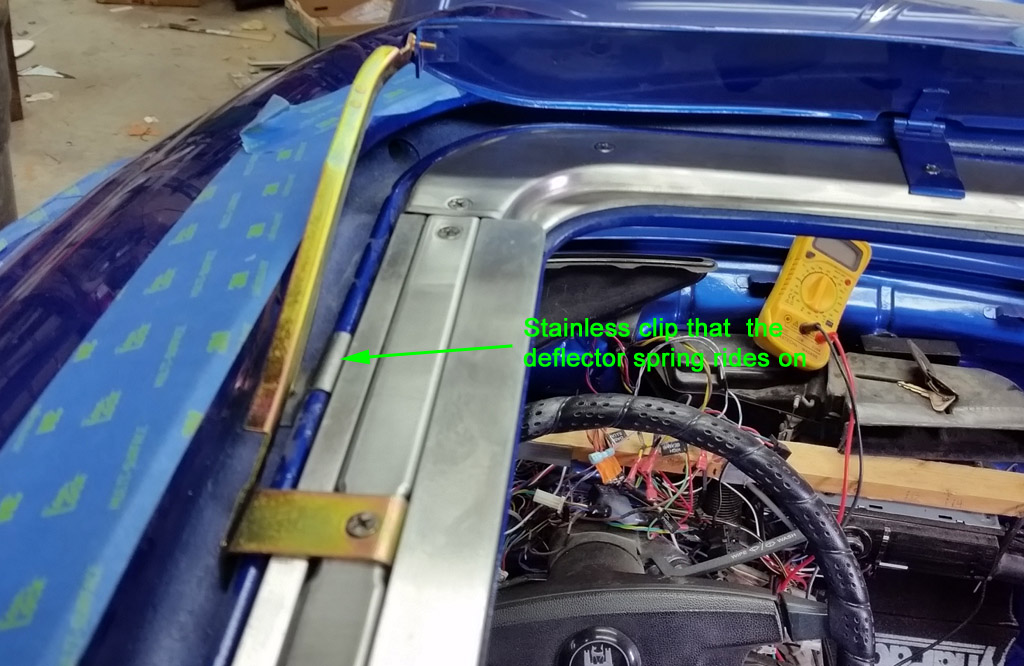
This part had me stumped, the stainless clip sits in the gutter giving a place for the sunroof wind deflector spring to ride:
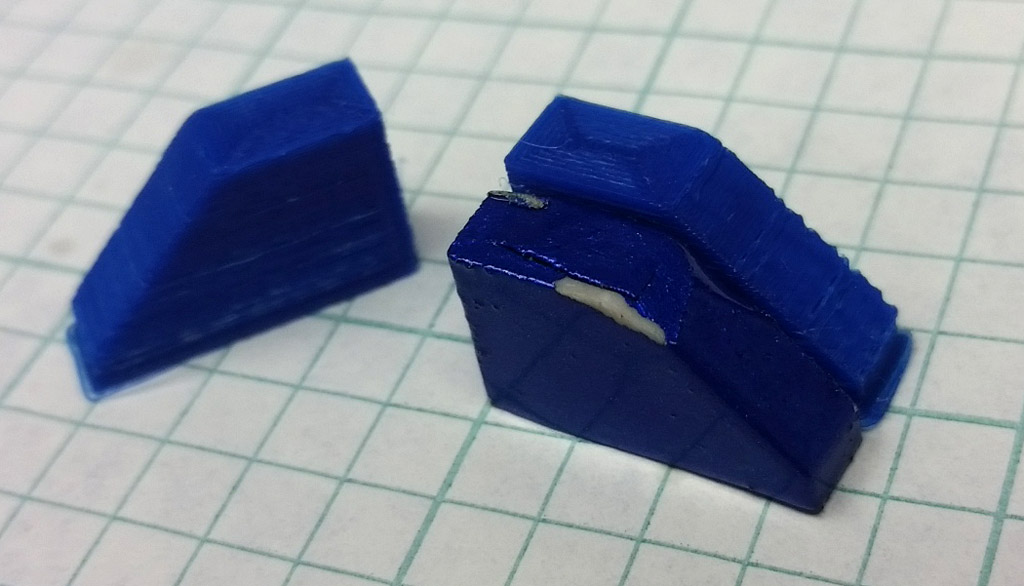
We ended up 3-d printing the plastic ramps. I could only find one of the four we should have had. Later we found that they are available after noticing the micro-small molded part number 411 877 145. Oh well, hopefully the 3-d printed ones will hold up OK:
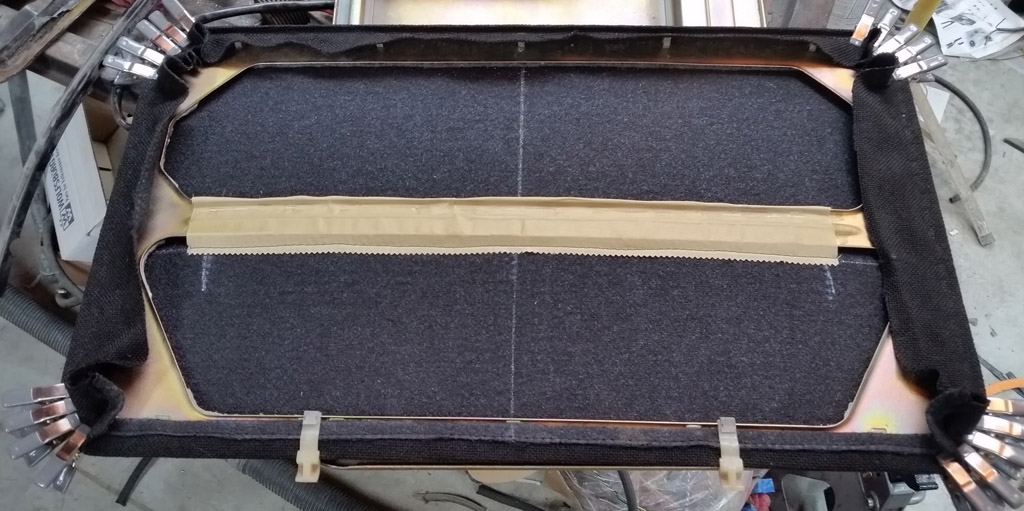
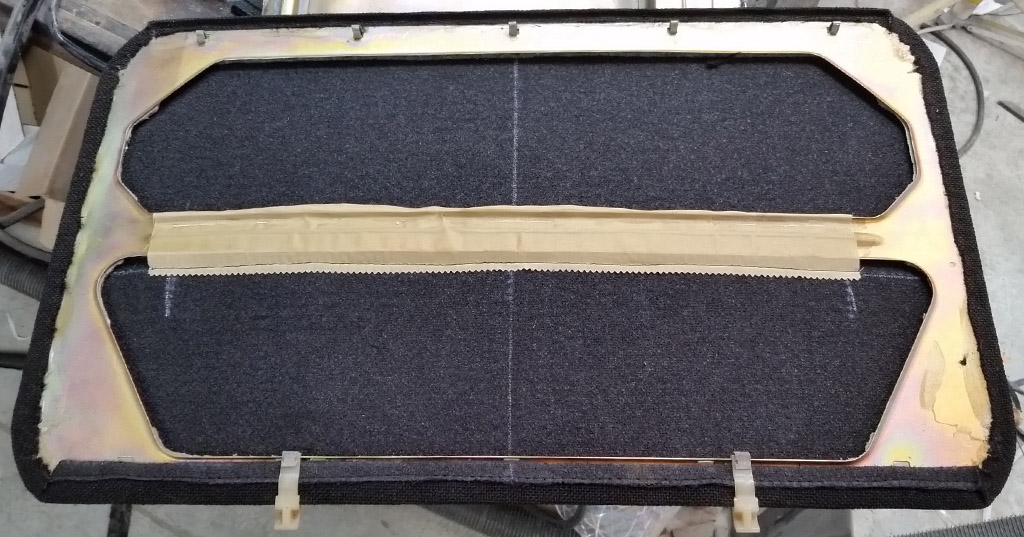
Since the sunroof headliner has to go in before both tracks are placed (now you tell me) we had to put the headliner fabric on the sunroof frame -- rather than the upholstery shop. We used contact cement (the brush-on type) to attach the fabric to the metal frame, with lots of clips:
On the rear of the slide, there are these little ramp / guide things. Protected from weather and sun, they are in pretty good shape for 40 years old:
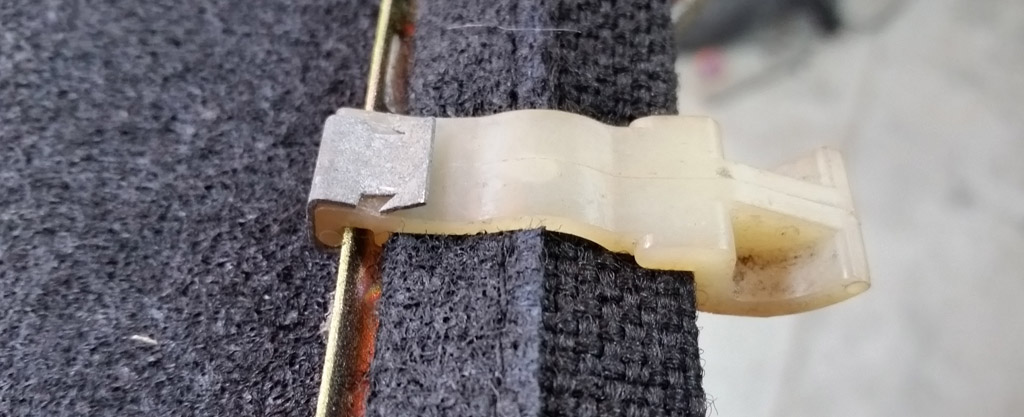
Completed sunroof headliner ready to install. Note that there is a flap sewn to the back of the headliner that glues to the metal cross bar. That holds the center of the sunroof headliner fabric up slightly, keeping it from sagging.
Still needs a bit of adjusting, but it works pretty well considering it is exactly the first time I have messed with a sunroof. |
|
| Back to top |
|
 |
Baxsie
Joined: 12 Apr 2012
Posts: 253
|
 Posted: Sat May 02, 2015 1:21 pm Post subject: Front License Plate Bracket Posted: Sat May 02, 2015 1:21 pm Post subject: Front License Plate Bracket |
 |
|
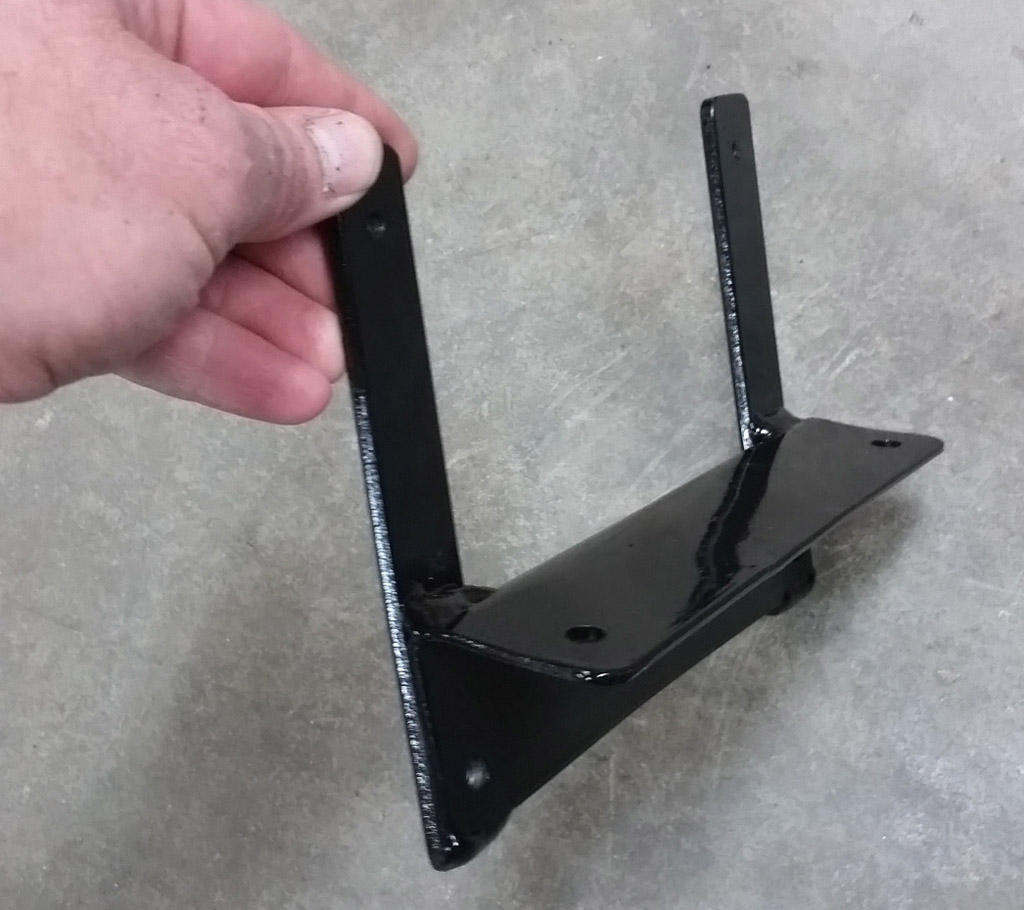
The front license plate and bracket always seem to get more than their fair share of abuse, and always seem to be bent up. We used some heavy flat stock, threaded to accept the plate screws and welded it to some slightly overbent 2" angle to make a bracket:
We put a layer of heavy duty outdoor rated double-sided tape between the bracket and the chrome. That should keep it from rattling or daamaging the chrome:
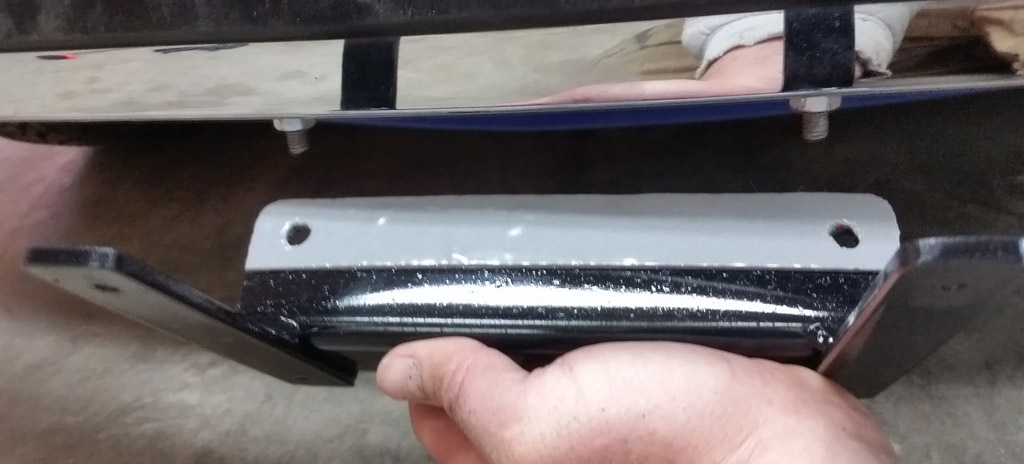
It tucks up about as close as it could be to the bumper, without making cutouts in the rub strip:
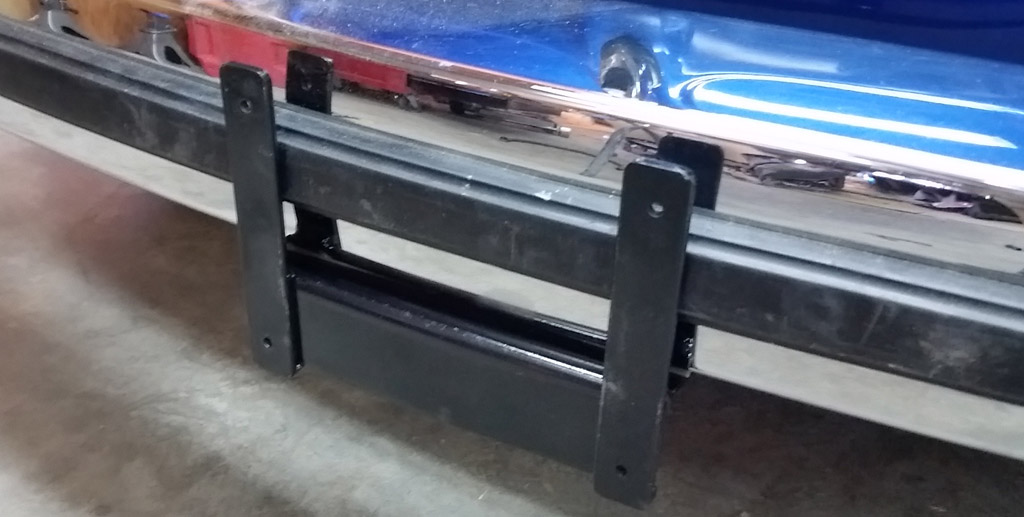
Stainless button head M6 thread into the bracket:

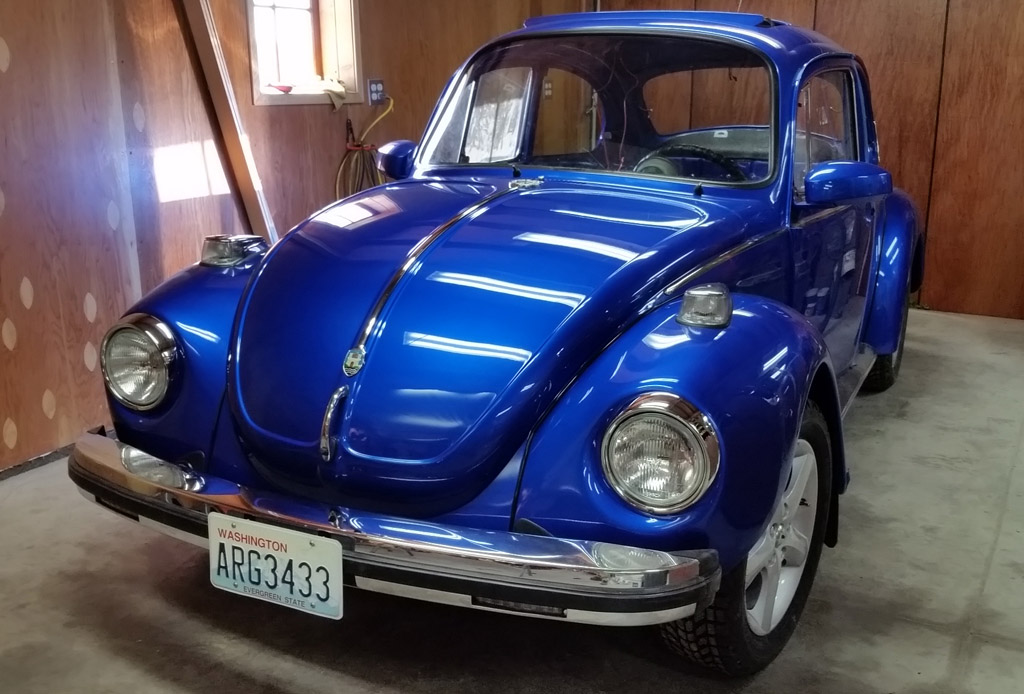
Ready to avoid getting pulled over:
 |
|
| Back to top |
|
 |
Baxsie
Joined: 12 Apr 2012
Posts: 253
|
 Posted: Sat May 02, 2015 1:33 pm Post subject: First tuning session on the Dyno Posted: Sat May 02, 2015 1:33 pm Post subject: First tuning session on the Dyno |
 |
|
After a bit of a push to get the car road-legal, we drove it to the Dyno for a base line and some very basic measurements:
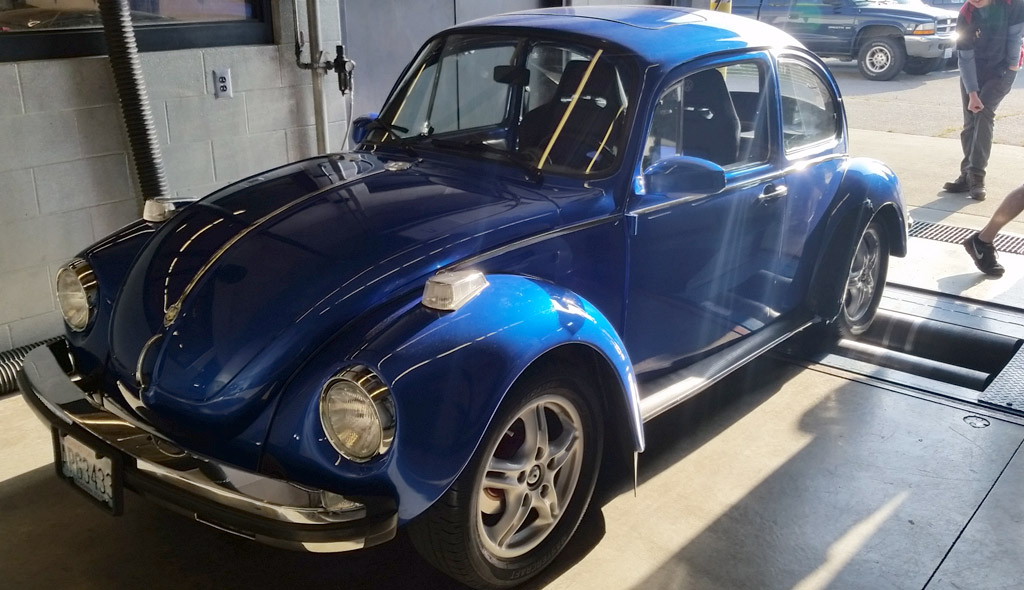
The Dyno use is part of a tuning class I'm taking (a nod here to Jeff of BadBug Racing, our instructor), one of the much more knowledgeable students helped me (he did the work, I watched) get some of the most basic full-throttle tuning correct.
The first shows a pretty bad dip at just over 3000 (lower traces), by the end of the class he had that smoothed out nicely (upper traces):
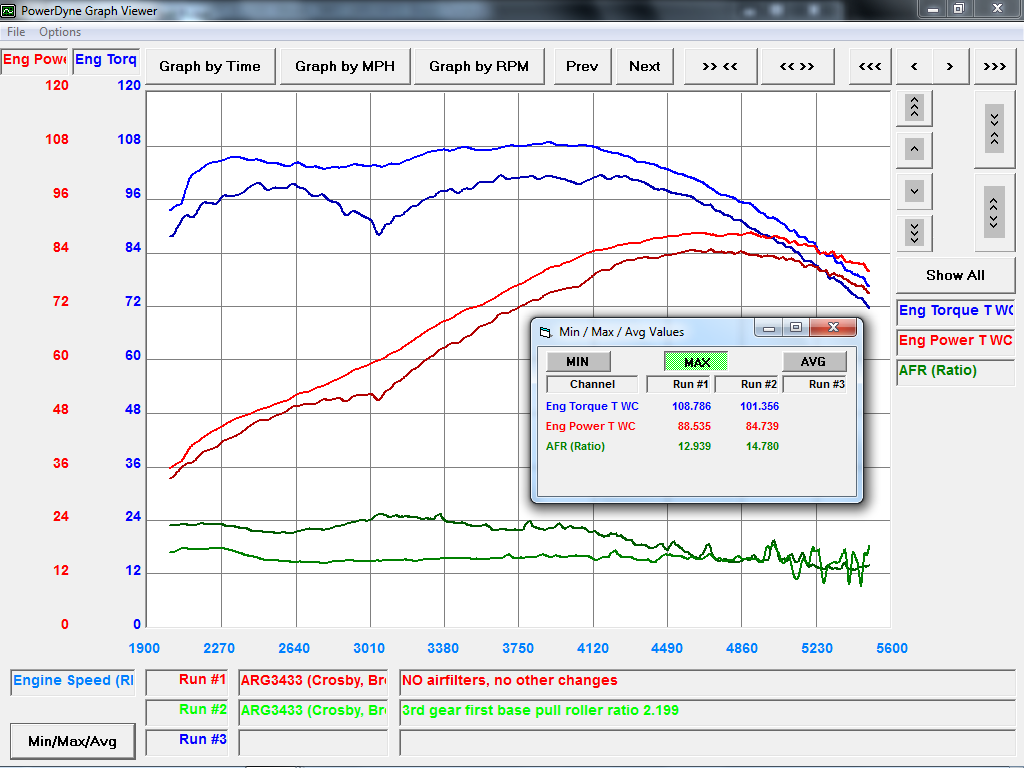
We had a problem with the throttle body butterflies on the right side sticking open after a run (that gets exciting) so we did not get as many runs in as we would have liked. Should be able to get back on the Dyno in a couple more weeks, and work through the table finding the optimal mixture, then the optimal timing. |
|
| Back to top |
|
 |
ONEBADBUG

Joined: 25 Oct 2003
Posts: 440
Location: Spokane
|
 Posted: Sat May 02, 2015 6:27 pm Post subject: Posted: Sat May 02, 2015 6:27 pm Post subject: |
 |
|
| What was the problem right around 3020 rpm? |
|
| Back to top |
|
 |
Baxsie
Joined: 12 Apr 2012
Posts: 253
|
 Posted: Sun May 03, 2015 7:16 am Post subject: Posted: Sun May 03, 2015 7:16 am Post subject: |
 |
|
Apparently just too lean there.
We are in a preliminary state of tune. Good enough to drive around, but still very grumpy when it is cold.
Once it warms up, it is quite driveable. Need to fix the butterfly problem, then get it back on the dyno to finish the fuel map, then once again to optimize timing.
Meanwhile, I am going to try warmup fixes on my own. |
|
| Back to top |
|
 |
Baxsie
Joined: 12 Apr 2012
Posts: 253
|
 Posted: Fri May 15, 2015 7:51 pm Post subject: Back on Dyno, working on Fuel and Ignition curves Posted: Fri May 15, 2015 7:51 pm Post subject: Back on Dyno, working on Fuel and Ignition curves |
 |
|
After the first real fuel tuning pass on the dyno, this is the fuel curve we came up with:
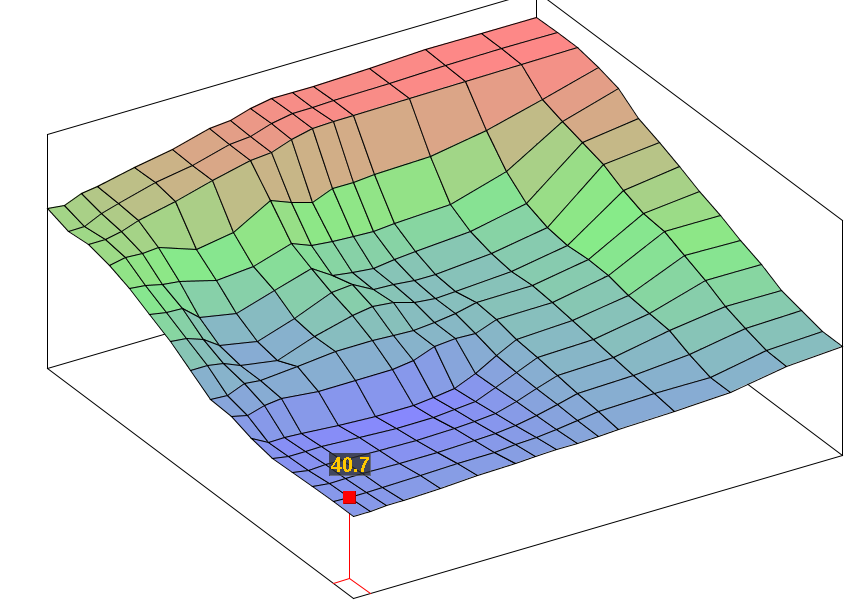
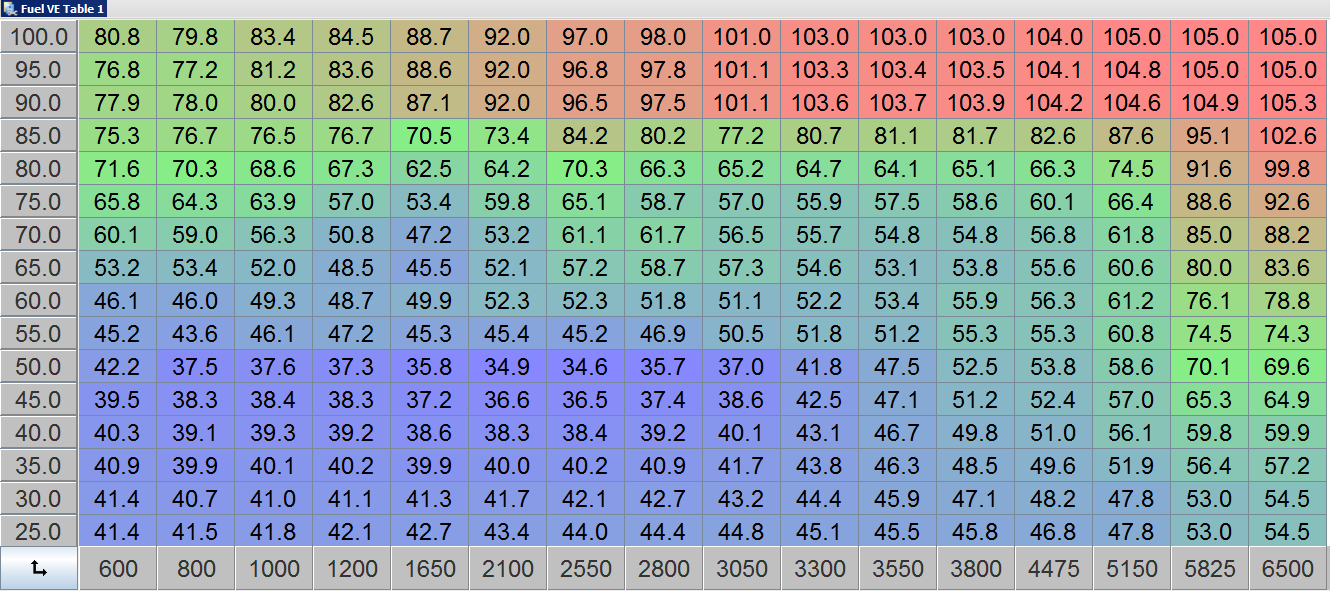
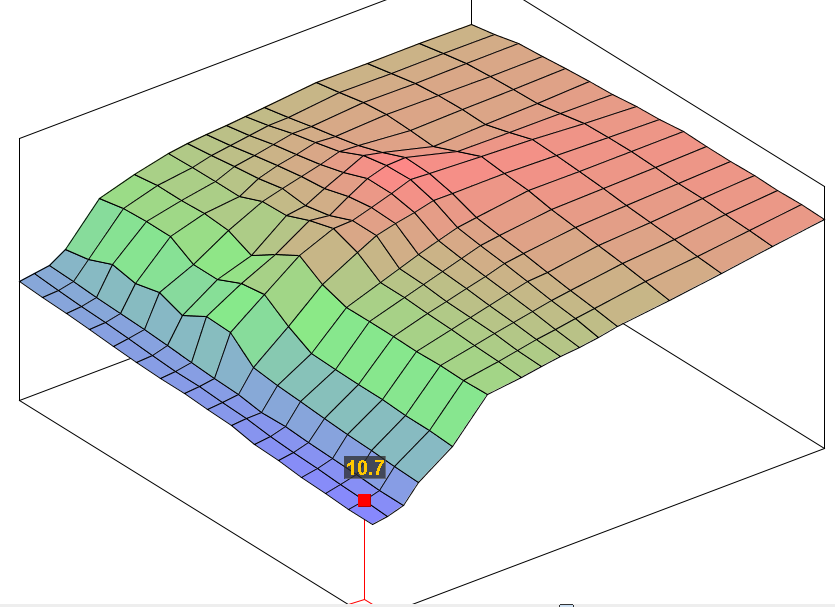
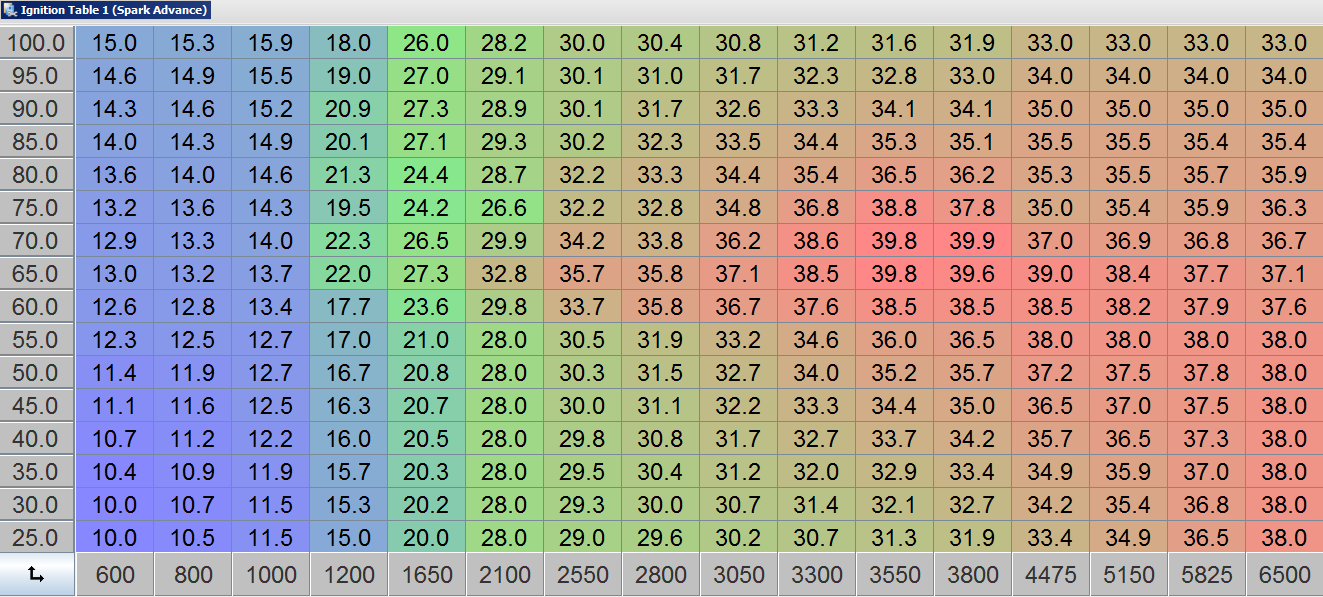
We then did some quick timing optimization, here is the timing table result:
A chart of a full pull using the new tables and the original:
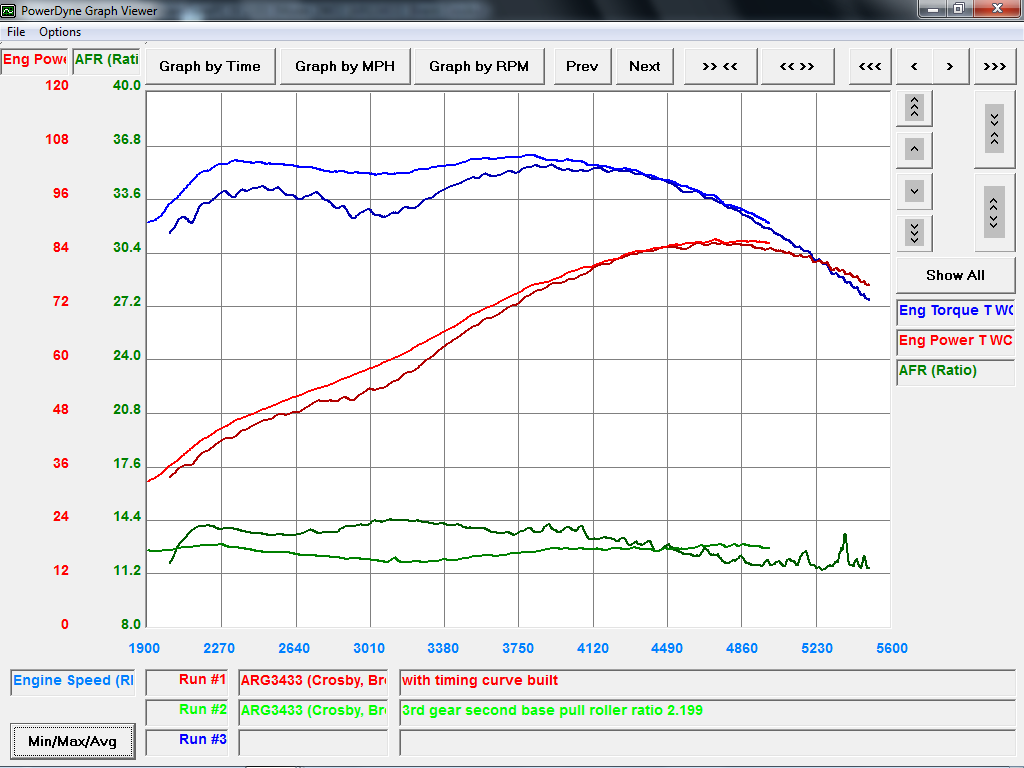
And a pretty scatter-plot of the drive home.
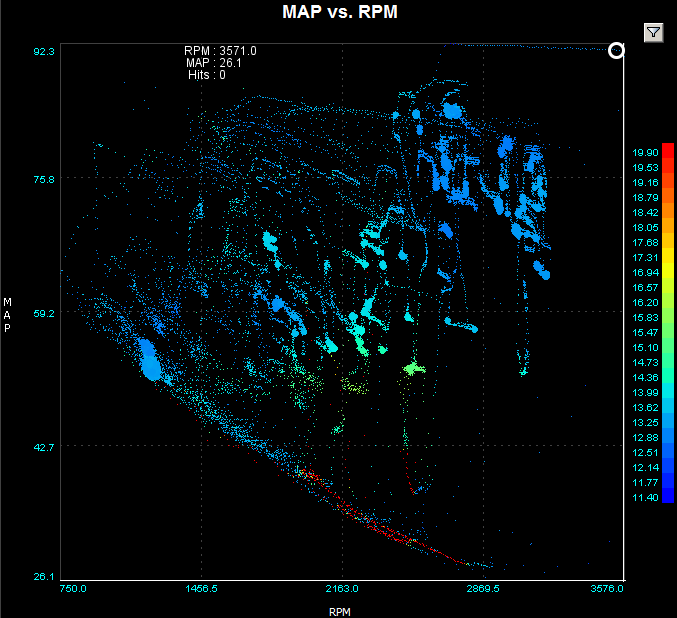
Here is a link to the MSQ, in case you want to see what we used:
http://baxsie.com/images/forum/bug/white_75/Dyno/Baxsie_2085cc_40mm_ITB_2015-05-14.msq |
|
| Back to top |
|
 |
Baxsie
Joined: 12 Apr 2012
Posts: 253
|
 Posted: Thu Jun 04, 2015 3:08 pm Post subject: Road Trip ! Posted: Thu Jun 04, 2015 3:08 pm Post subject: Road Trip ! |
 |
|
Took it for a drive, logging data shaking out problems. Stopped at a Steptoe Butte for some glam shots:
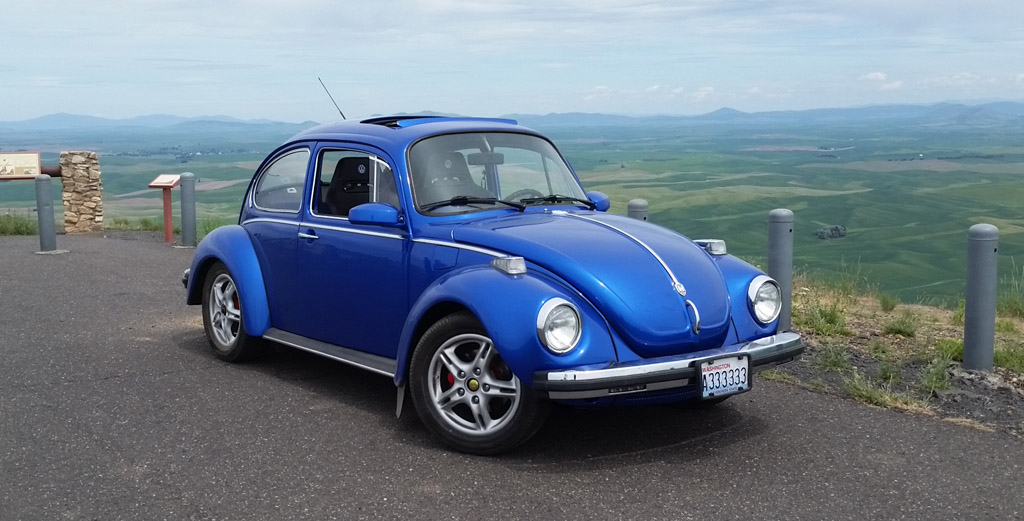
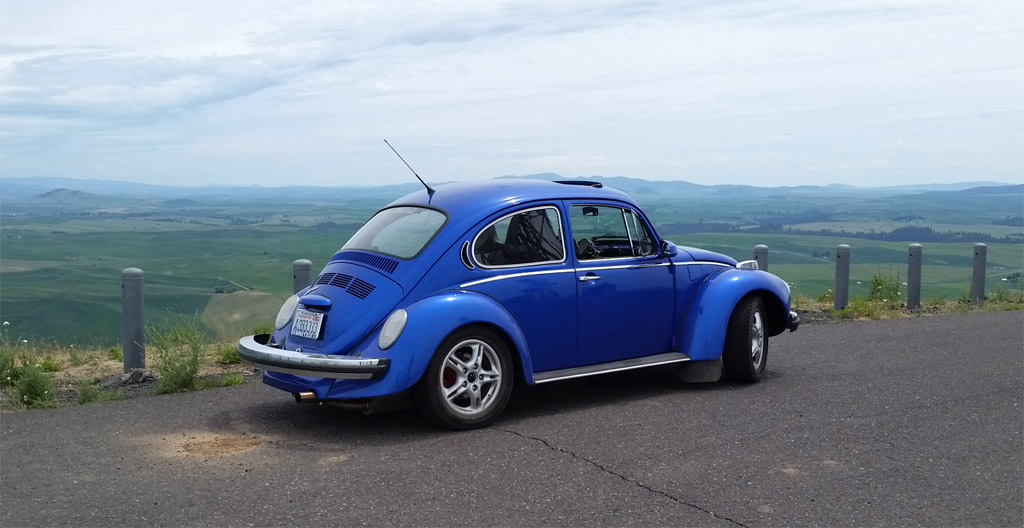
at https://goo.gl/maps/H3HII |
|
| Back to top |
|
 |
Baxsie
Joined: 12 Apr 2012
Posts: 253
|
 Posted: Sun Jun 07, 2015 8:11 pm Post subject: Adding IAC (Idle Air Control) to CB Throttle Bodies Posted: Sun Jun 07, 2015 8:11 pm Post subject: Adding IAC (Idle Air Control) to CB Throttle Bodies |
 |
|
Getting the idle speed right is a bit problematic. Once we got the idle speed correct at warm conditions, we found that there simply was not enough air for the car to start when cold. We got the IAC kit from DIYAutoTune:
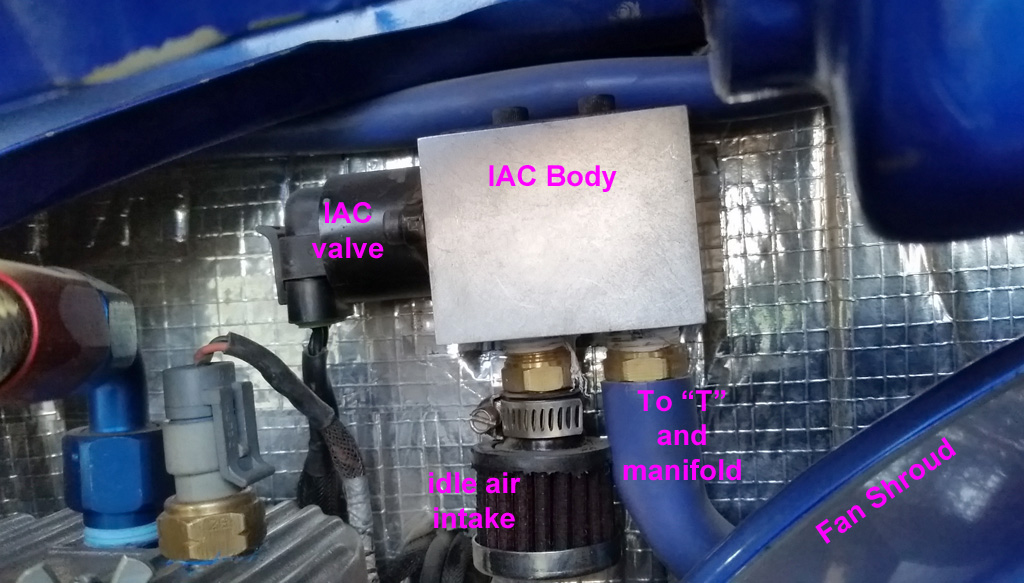
To filter the input, we used a little K&N 62-2480 Vent Filter. Cute, seems to work.
Originally we tired having it connected to feed air in to the same line that the measures MAP (Manifold Air Pressure). This actually worked, but when the IAC was open very far, the MAP was predictably very high, so the MegaSquirt thought that the throttle was almost wide open.
We needed two paths into the area of the throttle body and manifold below the throttle plates. The IAC path needs to have a pretty good flow, since the car will largely run from this path at idle. The MAP path just senses pressure without any flow, so a small tube is fine. I think the small tube can actually help damp and smooth the signal from the very noisy pressure signal between the a throttle plates and the intake valve before it gets to the MAP sensor.
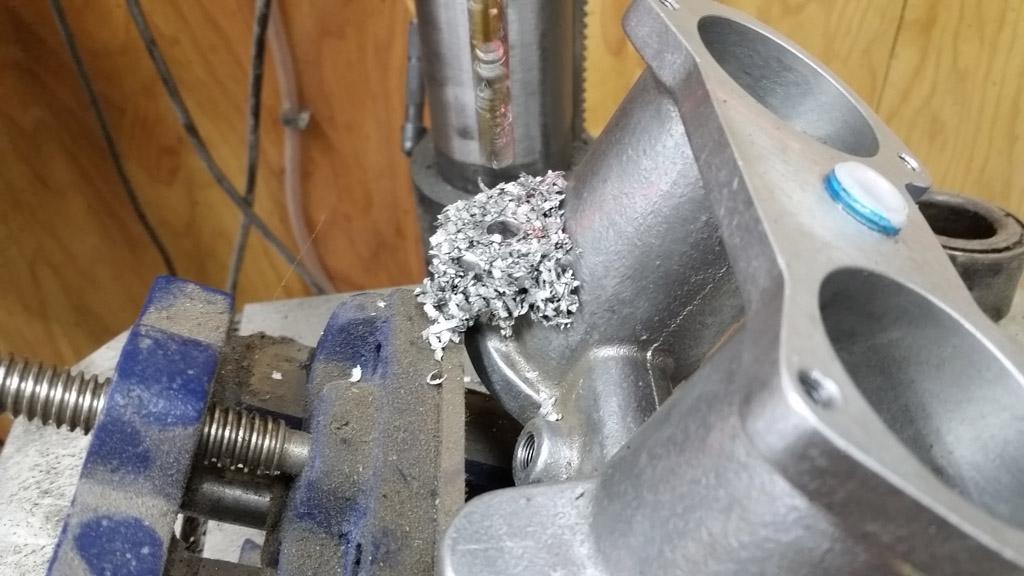
First off we needed to drill through the unused injector bosses in the CB Performance Throttle Bodies. The bosses are unused, since our injectors are installed deep in the CB offset manifold, very close to the intake valves.
Here is the drilling, finally an excuse to use the angle drill vise!
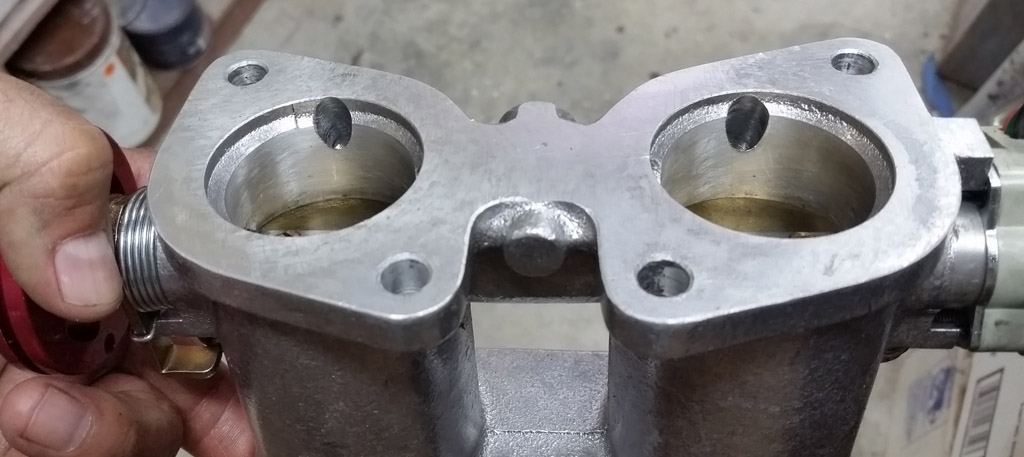
The exit came out about exactly where you would hope:
We then tapped the holes for 1/8 NPT:
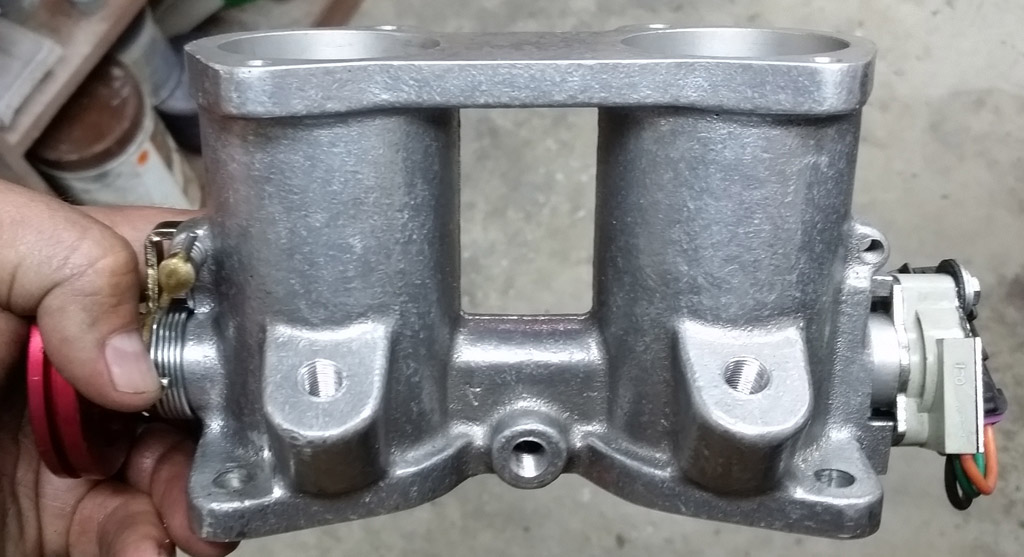
When adjusting dual carbs or dual throttle bodies, you must balance or synchronize the two sides to make the idle smooth. When the car is running mainly off the IAC, there is no control to balance the sides. We tried to make paths of both sides (4 paths total as exactly equal as we could to keep the motor balanced or synchronized when the IAC is activated. Really the IAC and its tubing act like a secondary manifold with the IAC acting like a single small throttle body:
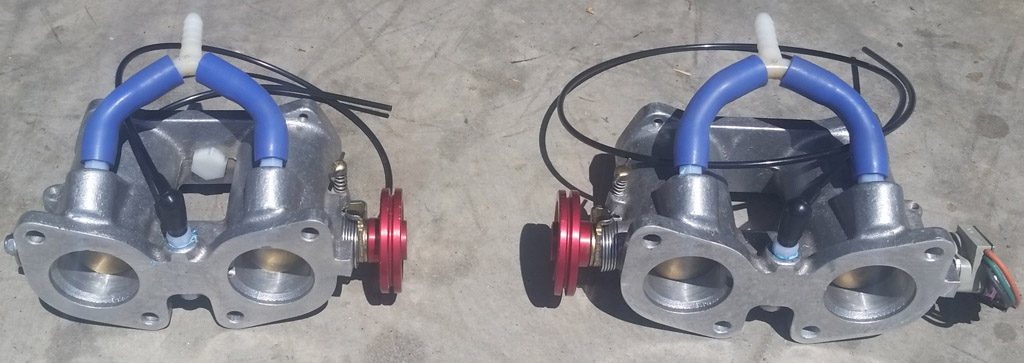
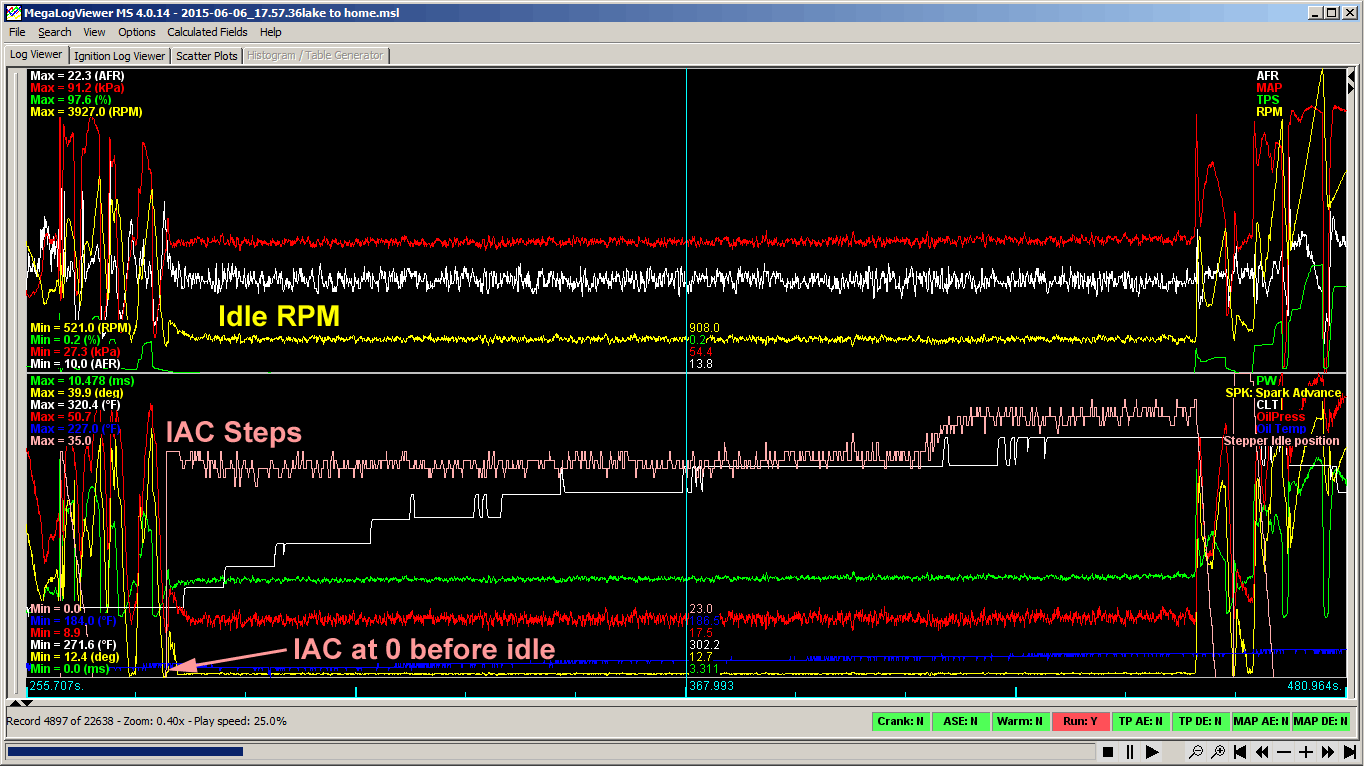
Once the IAC is working, it is prettty fantastic, we set the idle goal to 900, and the MegaSquirt opens the IAC just enough to make the engine run at 900 RPM. It just works. As soon as you are off idle, MegaSquirt closes the IAC, so it does not interfere with the original tune.
To make all this work we got the engine warm and set the idle to ~700 RPM and balanced/synchronized the throttle bodies there. Once the IAC is enabled, the RPM jumps up to 900 RPM. At cold start the IAC opens farther, whatever is needed to maintain that 900 RPM.
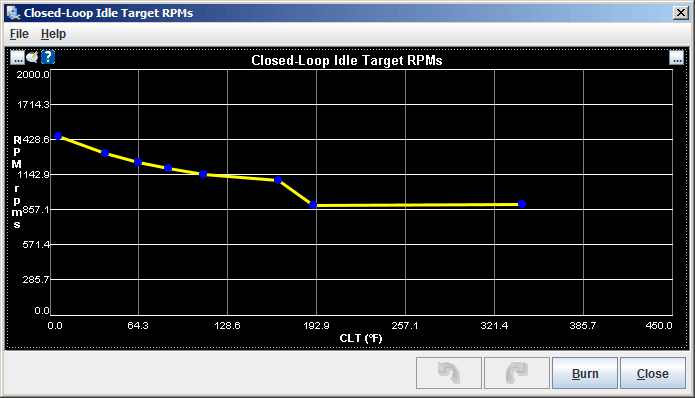
During warm-up, the idle target is set higher so you get a nice fast idle. As the temperature approaches normal, the target tapers back down to to my default 900 RPM:
Here is a bit of a log file. showing that wonderful flat 900 RPM idle 
We did all this work after the tune was complete, and I think that is the right sequence, but it did mean that this stuff was done as a retrofit. If you are going to do a MegaSquirt on a aircooled VW, I highly recommend including the IAC in your build. |
|
| Back to top |
|
 |
Baxsie
Joined: 12 Apr 2012
Posts: 253
|
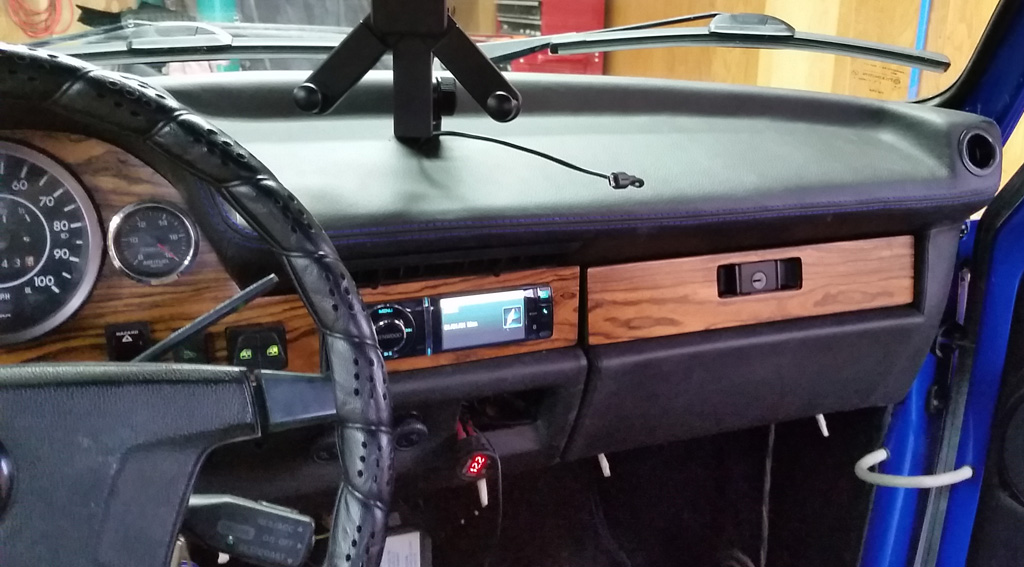
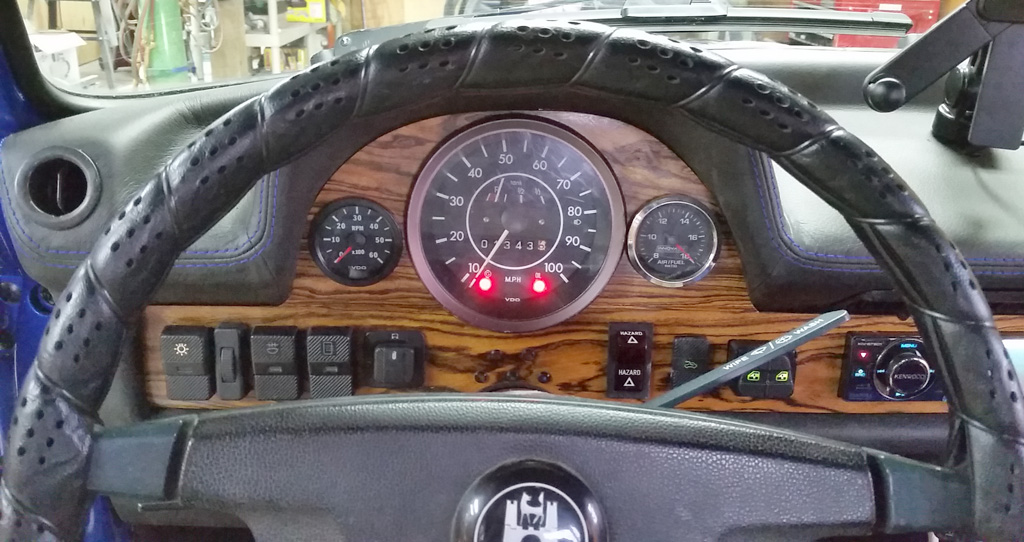
 Posted: Thu Oct 15, 2015 6:44 am Post subject: Dash board: wrapping it up in leather Posted: Thu Oct 15, 2015 6:44 am Post subject: Dash board: wrapping it up in leather |
 |
|
We were able to contact a fellow in Mexico who did a fantastic job of wrapping the modified dash.
Here is his playlist of the full videos of the operation:
https://www.youtube.com/playlist?list=PLoSIdv1C9uyQ5p0hYqlf1j-U2XiheZ_U0
Here are some pictures of the dash after we got it back.
Test fitting switches and gauges:
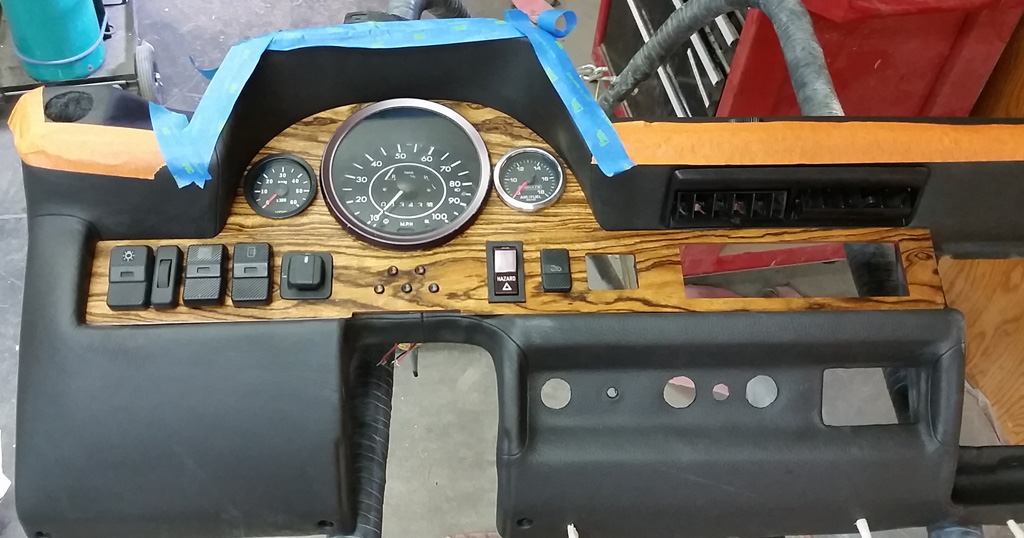
A view of the passenger side:
And what the driver sees, tach, speedo, AFR:
 |
|
| Back to top |
|
 |
|
|
You cannot post new topics in this forum
You cannot reply to topics in this forum
You cannot edit your posts in this forum
You cannot delete your posts in this forum
You cannot vote in polls in this forum
You cannot attach files in this forum
You can download files in this forum
|
|


